How To Create A Poll In WordPress In Seconds (No-Code Tutorial)
Adding a poll in WordPress shouldn’t feel like coding a form.
If you’ve ever copied a shortcode or embedded a third-party tool just to collect a few votes, you know how messy it can get.
If you’ve ever wondered how to create a poll in WordPress without shortcodes or extra tools, Pollify makes it visual and code-free.
Let’s walk through the full process of creating your first WordPress poll, customizing its design, and setting up voting behavior step-by-step.
If you’ve ever tried adding a poll in WordPress, you’ve probably dealt with shortcodes, third-party embeds, or clunky form builders.
They work — but not in a modern, block-editor world.
Today, you can create and publish interactive polls in WordPress directly from the Gutenberg editor, without a single shortcode. And the best way to do that is with Pollify, a lightweight, block-native plugin designed exactly for this.
This guide walks you through everything from the basics of WordPress polls to preparing your first live, no-code poll setup.
The Problem With Shortcode-Based Poll Plugins
If you’ve used plugins like Crowdsignal, Poll Maker, or YOP Poll, you know the drill: Create your poll in an external interface, copy a shortcode, paste it into your post, and hope it looks right.
Shortcodes were fine years ago, but they break the live editing experience WordPress now prioritizes. You can’t preview your poll in the editor, you can’t tweak spacing visually, and updates mean juggling back and forth.
Plus, shortcode-based plugins often come with:
- External dashboards and login dependencies
- Heavy scripts that slow down your site
- Poor Gutenberg integration (or none at all)
- Limited layout control inside the editor
That’s where Pollify takes a completely different path.
Meet Pollify: The Block-Native Poll Plugin For WordPress
Pollify is a modern poll plugin built entirely for the Gutenberg editor.
It doesn’t use shortcodes, iframes, or extra dashboards. Everything happens right where you already work, inside WordPress.
You just add the Pollify block, write your question, and choose how the options appear. It’s as natural as adding an image or paragraph.
Key highlights of Pollify (lite version):
- 100% block-based, no code or embeds
- Unlimited polls and votes
- Multiple layouts (vertical, horizontal, stacked)
- Optional vote limits per user
- Custom confirmation messages
- Live results view inside editor
- Individual vote deletion and IP-level control
And the Pro version adds even more, like:
- Open-text feedback and reactions
- Like/Dislike and NPS-style polls
- Exporting results to CSV, Excel, or PDF
- Detailed engagement tracking
In short, Pollify replaces every “poll plugin workaround” with a clean, native workflow.
How to Create a Poll in WordPress Using the Block Editor
Let’s get started with this no-code guide.
Start with Installing Pollify
Open your WordPress dashboard and go to Plugins → Add New.
Search for Pollify, click Install Now, and then Activate.
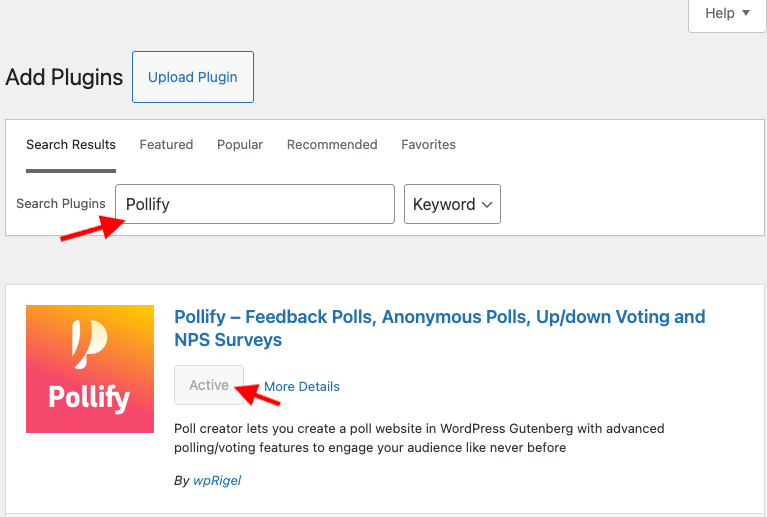
After activation, a new Pollify tab appears in the sidebar. This is your hub for managing all polls. The free version works out of the box — no registration or license key needed.
If you visit the Pollify screen, you’ll see it’s empty for now. Don’t worry; we’ll create your first poll directly inside a page.
- Open any page or post in the Gutenberg editor.
- Click the + Add Block button and search for “Pollify”.
- Select Pollify Poll Block.
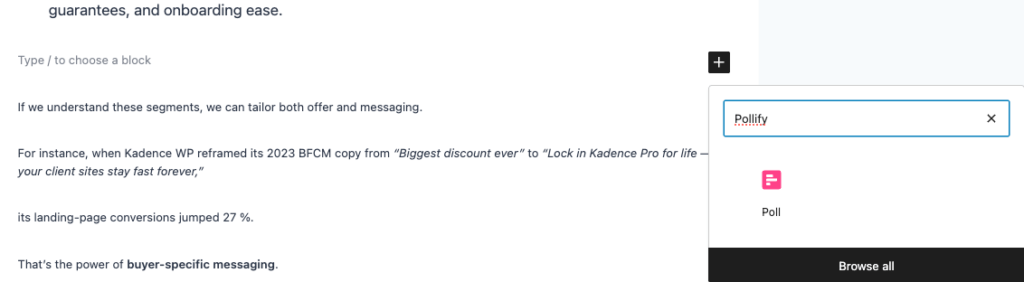
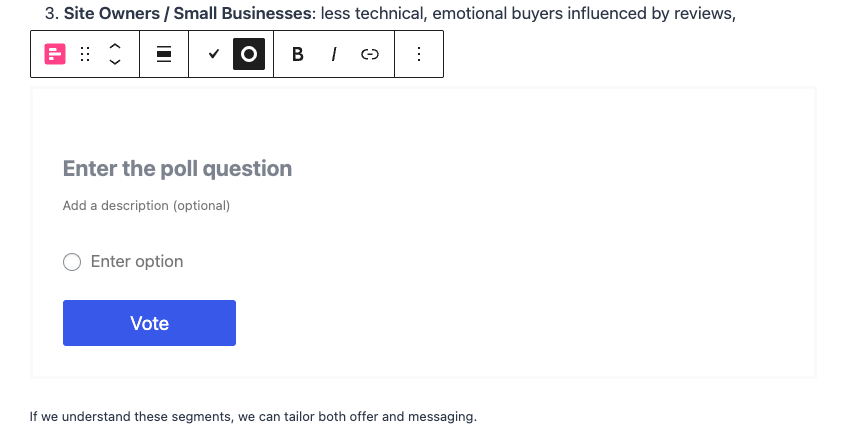
The poll interface appears instantly inside the editor.
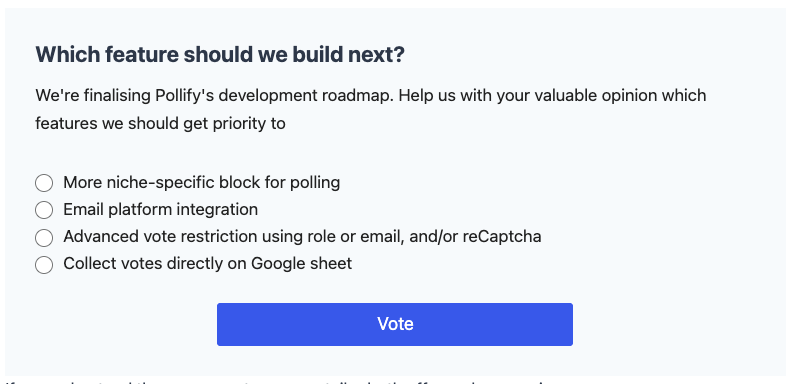
You’ll see a question field, two default options, and a preview area that updates as you type.
This block behaves like any other Gutenberg element- you can move it, duplicate it, or place it inside columns to match your layout.
Writing The Question
Click the placeholder text that says Type your question here and enter your question.
Keep it short and clear, something people can answer instantly:
Which feature should we build next?
Do you prefer light or dark mode?
Simple questions drive higher engagement. You’ll see the live preview adjust as you type, showing the actual front-end appearance.
Adding And Managing Options
Below the question, add your possible answers.
Click Add Option for each new choice- there’s no limit. To reorder, drag the handle on the left; to remove, click the small trash icon.

Pollify’s free version supports unlimited polls and options, so you can run a single poll with many answers or several smaller ones across posts.
Choosing A Layout
Pollify includes three layout styles:
- Vertical list – traditional stacked options; ideal for text-heavy answers
- Horizontal buttons – compact, perfect for yes/no or emoji-style votes
- Stacked compact – fits neatly into sidebars or narrow sections
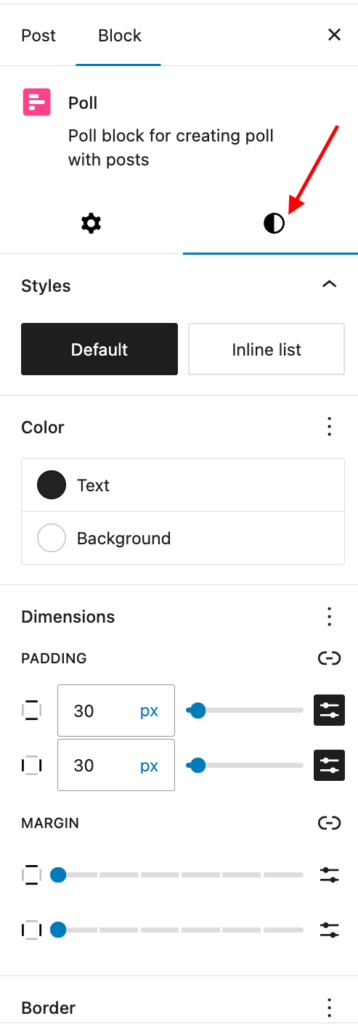
Select the poll block and open the Block Settings panel on the right. Under Layout, click through the available styles until one fits your design.
Each layout automatically inherits your theme’s typography and color scheme, so you rarely need custom CSS.
Customizing Your WordPress Poll Design
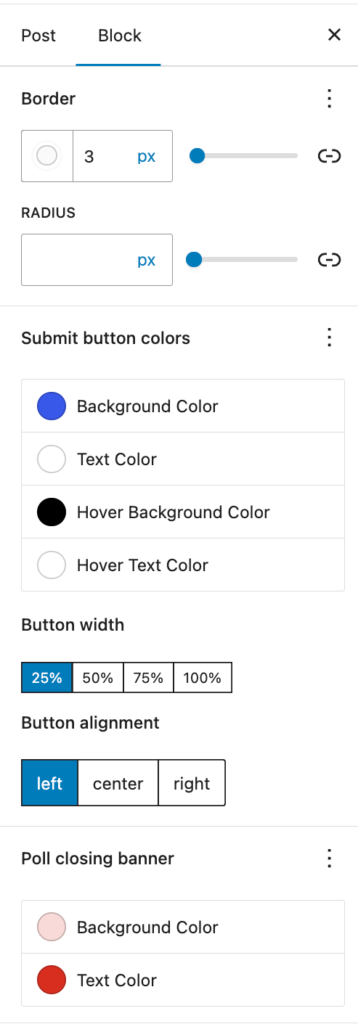
Still in the sidebar, scroll to Style Settings. Here you can fine-tune visual details:
- Button color and hover color: match your brand palette
- Border radius: choose rounded or square buttons
- Vote counter visibility: show total votes below each option
- Percentage view: display relative results instantly
Because Pollify is a Gutenberg block, you can wrap it in Group or Column blocks, adjust padding, or align it like any other content.
Configuring Voting Behavior
Now decide how people will interact with your poll.
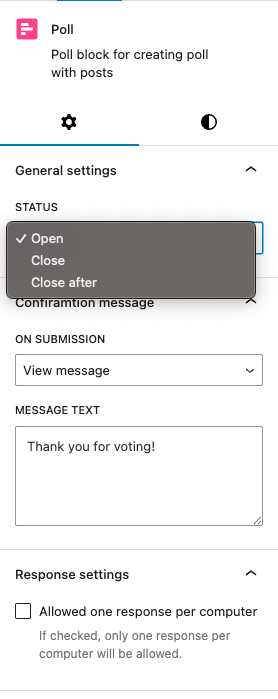
Open the Settings section in the right sidebar.
- Vote limits: Turn on Limit one vote per user to prevent duplicate votes. Pollify uses browser sessions and optional IP tracking for fairness.
- Results visibility: You can reveal results immediately after someone votes or keep them hidden until the poll closes. For quick feedback loops, “show after vote” works best; for competitions or quizzes, hide results until later.
- Start and end time: Set an automatic schedule if your poll relates to an event or campaign. The poll will open and close on its own — no manual work.
- Confirmation message: Add a short success note like Thanks for voting! It appears right after submission and keeps the interaction smooth.
These few settings give you control over how people engage without ever leaving the editor.
Previewing and Publishing Your Poll in WordPress
Click Preview in the top-right corner. The page opens exactly as visitors will see it, including live poll styling and buttons.
If everything looks good, hit Publish.
Your WordPress poll is now live, responsive on all devices and completely embedded in your content.
Visitors can vote instantly, and Pollify stores all data safely in your site’s database.
Viewing And Managing Results
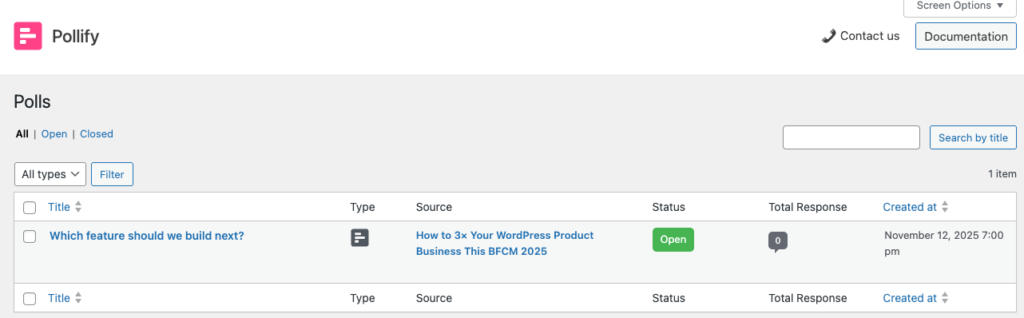
Back in the dashboard, open Pollify → All Polls.
Here you’ll see every poll with its total votes, status, and quick actions.
- View Results: shows each answer with exact vote counts and percentages.
- Reset Votes: clears all responses, handy when you reuse a poll.
- Delete Vote: removes a single entry (for test or duplicate votes).
You don’t need an external analytics dashboard, everything’s inside WordPress.
Advanced Ways to Create a Poll in WordPress with Pollify Pro
When you need more than simple multiple-choice polls, Pollify Pro unlocks advanced features while keeping the same editor interface.
Up/Down Poll: Easily add up/down or like/dislike poll to get quick feedback on any post, page, feature, course pr product.

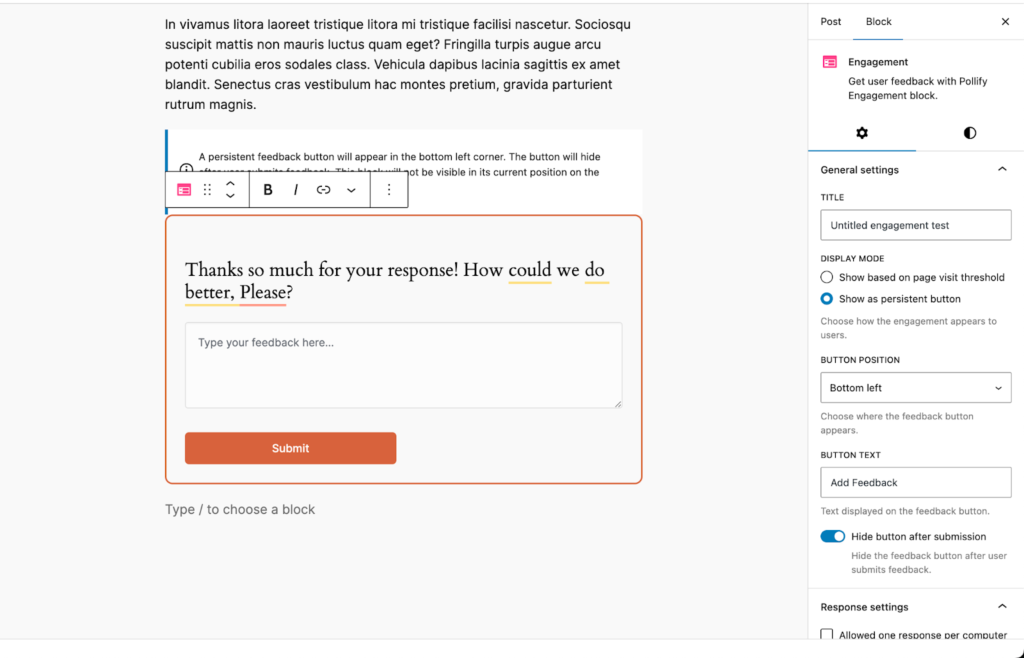
Engagement block: Adds open-text fields and emoji reactions so users can write feedback or send kudos.
NPS polls: Switch the question type to a 0-to-10 satisfaction scale- ideal for post-purchase surveys or content ratings.
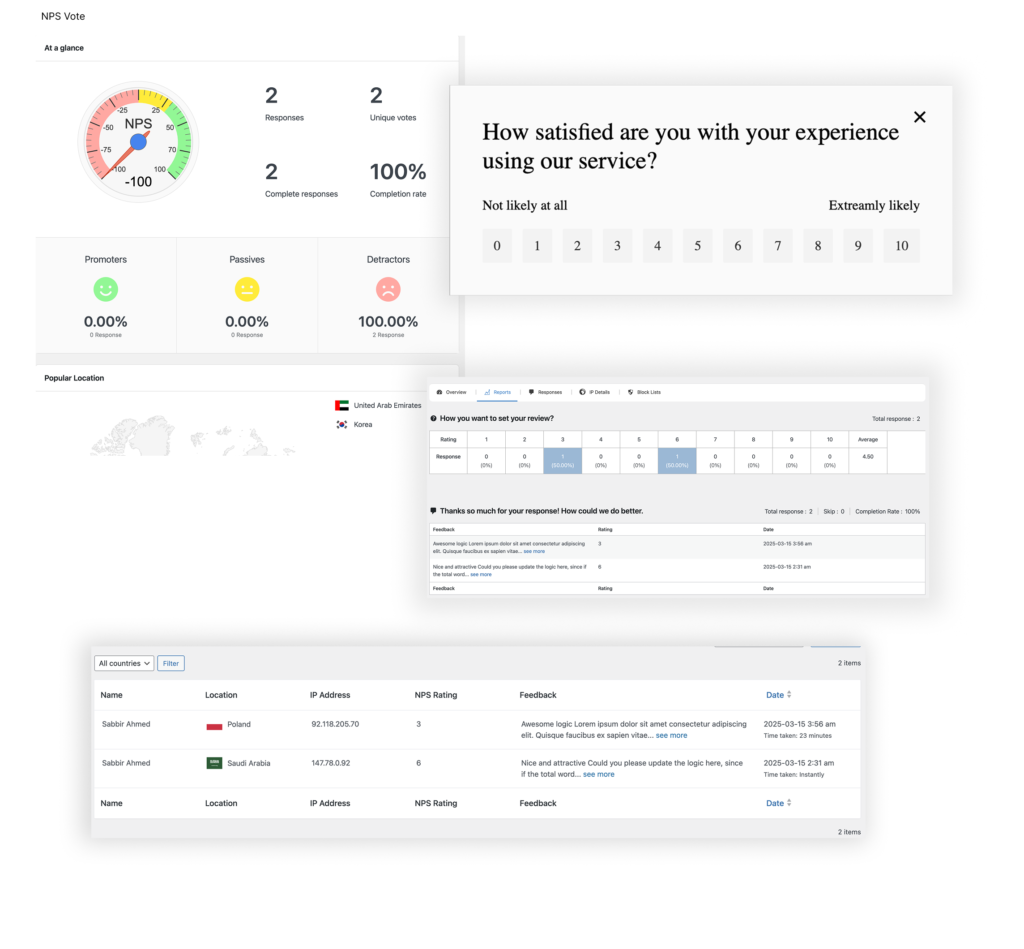
Exporting results: Download responses as CSV, Excel, or PDF files. Teams often use this for reporting or presentations.
Advanced control: Set stricter IP limits, restrict voting to logged-in users, or disable results display completely.
Everything sits in the same familiar sidebar — you just gain more toggles and data options.
Quick Troubleshooting
If you don’t see votes registering, check any caching plugin and exclude Pollify endpoints from page cache.
If styling looks off, wrap the poll in a Group block and use theme spacing controls.
Pollify’s clean, native code rarely conflicts with themes, but caching can block vote requests if left unexcluded.
You’re Done
You’ve just built and published an interactive poll in WordPress without touching a shortcode or external script.
In a few clicks, you created a fully branded, responsive poll, previewed it live, and made it collect data right from your site.
That’s the power of working natively in the block editor.
Advanced Poll Setup And Design Tips For WordPress with Pollify
Now that you’ve created your first poll in WordPress, it’s time to make it shine.
The next steps cover advanced customization, poll management, and design techniques to make your polls look great and collect more meaningful feedback- all still inside WordPress, no shortcodes or third-party tools.
Adjusting Poll Design With Global Styles
One of Pollify’s biggest strengths is how smoothly it integrates with the block editor’s Global Styles.
If your theme uses WordPress’s Site Editor (as most block themes do), you can control fonts, button colors, and border radius globally — and your polls will follow automatically.
To tweak:
- Go to Appearance → Editor → Styles.
- Adjust typography, color palette, and spacing.
- Return to your post — your poll instantly matches the new theme style.
This consistency helps your poll blend into your site’s design, especially when you use it across multiple pages or categories.
Using Polls Across Post Types
Pollify isn’t limited to blog posts. You can add a poll block to any content type that supports the Gutenberg editor.
Common examples:
- WooCommerce product pages: ask visitors what color or feature they prefer.
- Course or LMS lessons: collect student opinions at the end of a module.
- Landing pages: measure interest in an upcoming feature or event.
- Membership dashboards: poll users about new community ideas.
Each poll works independently — votes on one product or course don’t mix with others.
If your site uses reusable templates (e.g., product or course templates), you can insert the Pollify block once, and every new post of that type inherits it automatically.
Scheduling And Managing Multiple Polls
Running several polls at once? Pollify’s management dashboard keeps things organized.
Go to Pollify → All Polls in your admin panel.
Each entry lists:
- Poll title and page it’s embedded in
- Start and end date
- Total votes so far
- Status (active, scheduled, closed)
You can filter or search polls by name, making it easy to track engagement over time.
To schedule automatically, open any poll in the editor, click Poll Settings → Schedule, and set your start and end times.
When the end time passes, Pollify automatically disables voting and freezes the results.
Exporting And Analyzing Poll Data
If you’re using Pollify Pro, you can export votes for deeper analysis.
From the poll’s dashboard, click Export Results and choose between CSV, Excel, or PDF.
CSV and Excel are perfect for importing into Google Sheets or Data Studio.
You can create charts, segment results, or compare responses from multiple polls — ideal for agencies, marketers, and educators.
Even without exports, Pollify’s built-in analytics show live counts and percentages for every option, updated in real time.
Adding Feedback And Reactions (Pollify Pro Feature)
Polls often spark engagement, but sometimes you want more context than a single click.
That’s where Pollify Pro’s Engagement Block helps.
You can add:
- A text box for short comments or suggestions.
- Emoji or “kudos” reactions that let people cheer, clap, or applaud content.
This extra feedback turns your poll into a mini survey without any external form plugin.
It’s especially useful for blog posts, portfolios, or podcasts where users can respond emotionally rather than just vote.
Embedding Polls In Sidebars Or Templates
Want a site-wide poll in your sidebar or footer?
You can add Pollify through a Widget Area or Template Part:
- Go to Appearance → Editor → Template Parts.
- Choose “Sidebar” or any area you want the poll to appear.
- Insert a Pollify – Poll Block directly there.
Now the poll shows up on every page using that template.
It’s a great way to collect ongoing votes, such as “Which article topic should we cover next?”
Accessibility And Performance
Because Pollify is 100% block-native, it inherits all of WordPress’s accessibility and performance best practices automatically.
That means:
- Clean HTML output (no embedded iframes)
- Full keyboard navigation support
- Lightweight scripts that load only when a poll is present
This makes Pollify suitable even for large, performance-optimized sites using caching or static generation plugins.
Common Use Cases For WordPress Polls
If you’re wondering how far you can take this, here are real-world examples of where Pollify fits perfectly:
- Blogs & Magazines: Ask for reader opinions or story preferences.
- eCommerce Sites: Run quick “Which product should we restock next?” polls.
- Educational Platforms: Gather student satisfaction data after each course.
- Nonprofits & Communities: Vote on campaign themes or volunteer ideas.
- Agencies & Designers: Use polls to collect client preferences during project phases.
These lightweight polls often perform better than full surveys because they require no form filling — just one click.
Maintaining Polls Over Time
You can reuse existing polls by cloning them from the dashboard.
Click Duplicate, update the question, and insert it into another post.
Old polls can be archived or exported. Keeping them organized ensures your site’s performance and database remain clean over time.
Smart Design Tips For Higher Engagement
Pollify already gives you the tools, but design choices determine how many people actually vote. Here’s what works best across WordPress sites:
1. Keep questions simple.
One clear question with 2–5 options performs best. Avoid long sentences or technical jargon.
2. Place polls where attention peaks.
Middle of an article or just before a CTA works better than the sidebar alone. People engage when they’re already invested in your content.
3. Match your tone to the audience.
Fun questions get higher response rates on blogs; direct ones perform better on business or course sites.
4. Use contrasting button colors.
Make vote buttons pop but still fit your color palette. Pollify inherits theme colors, but a slightly bolder accent improves visibility.
5. Show results right after voting.
Instant results create satisfaction and encourage sharing. You can also disable this if you prefer suspense for time-limited polls.
Why Polls Matter In WordPress During AI Era
Engagement is a huge ranking and retention factor. Readers who interact with your content (even with a simple vote) stay longer, share more, and give you insights you can actually use.
A quick poll can help you:
- Collect audience opinions in seconds
- Get feedback on new posts or designs
- Run small surveys without setting up external tools
- Keep your readers clicking, not just scrolling
That’s why every serious site (from blogs to stores to LMS platforms) uses polls somewhere. The problem is, most plugins that do it are still built for the Classic Editor days.
How WordPress Polls Work (Quick Overview)
A poll in WordPress is a small form element that lets users pick an answer from multiple options and instantly view results.
Unlike surveys or long forms, polls are fast, visual, and low-friction.
Technically, a poll plugin handles three jobs:
- Rendering the poll question and choices on the front end.
- Recording each vote (and preventing duplicates).
- Showing live results (either publicly or to admins only).
Traditional plugins did this using a shortcode [poll id="123"] — which WordPress interprets when displaying your post. Pollify skips that system entirely, because Gutenberg blocks already handle dynamic rendering.
That’s why Pollify’s poll block is lighter, faster, and more secure than shortcode-based systems.
Pollify vs Other WordPress Poll Plugins
If you have used other poll plugins before, you already know how most of tools still rely on shortcodes or external dashboards. Pollify takes a simpler route. It works directly inside the block editor, so you build and preview polls the same way you create a page or post.
| Feature / Plugin | Pollify | Crowdsignal | Poll Maker | YOP Poll | WP Polls |
|---|---|---|---|---|---|
| Block editor support | Fully native to Gutenberg | Limited, classic editor only | Partial integration | Not supported | Not supported |
| Shortcodes required | No | Yes | Yes | Yes | Yes |
| Free version available | Yes | Yes | Yes | Yes | Yes |
| Layout options | Vertical, horizontal, stacked | Few basic styles | Several layouts | Basic only | Minimal |
| Live preview inside editor | Yes | No | No | No | No |
| Data export (Pro) | CSV, Excel, PDF | CSV only | CSV only | Not available | Not available |
| Pricing (1 site license) | 79 USD per year | 180 USD per year | 39 USD per year | Free | Free |
| Best suited for | Block-based modern sites | Surveys and form users | Small personal sites | Legacy WordPress installs | Basic voting needs |
Pollify keeps the workflow native and visual. The others still depend on shortcodes or external forms that interrupt editing.
If your goal is to create a poll in WordPress quickly and manage it without extra tools, Pollify is the most efficient option.
FAQs About Creating Polls/Surveys In WordPress
Q1: Can I create multiple polls on the same page?
Yes, Pollify supports multiple poll blocks per page. Each poll tracks votes separately.
Q2: Do I need to use shortcodes to display a poll?
No. Pollify is block-native, so you insert it visually like any other block — no shortcode required.
Q3: Can users change their vote?
By default, no. Once a user votes, that response is stored. You can reset or reopen polls manually if you want to allow re-voting later.
Q4: Will caching affect poll results?
If you’re using aggressive caching (like LiteSpeed or WP Rocket), exclude /wp-json/pollify/ endpoints from cache. This ensures votes register in real time.
Q5: Does Pollify work with all WordPress themes?
Yes, it’s compatible with both classic and block themes. It automatically adjusts fonts and colors to match your design.
Q6: Is there a way to export results in the free version?
Exporting is a Pro feature, but you can still view results in the admin panel without upgrading.
Wrapping Up on How to Create a Poll in WordPress with Pollify
That’s it!
Now you know exactly how to create a poll in WordPress, from setup to live results, all without a single shortcode.
Pollify turns polling into a native editing experience: clean, fast, and easy for anyone managing a WordPress site.
Whether you’re gathering feedback, testing ideas, or simply increasing engagement, having an interactive WordPress poll right inside your post can make a big difference.
Start with the free version, explore its Pro tools as you grow, and watch how your visitors begin to interact- not just read.