

Krom Automation is live. Save up to 50% on Krom Automation Pro.

Orders, emails, CRM syncs and alerts, all automated inside WordPress.

Buy Now! →
wprigel logo
  • Home
  • Products
    • krom-automation-icon

      Krom Automation

      Build visual workflows that respond to signups, orders, forms, and posts- automatically. Free plugin, no monthly fees.
    • commandify-logo-pink

      Commandify- Best Command Palette Plugin for WordPress

      Navigate, search, and manage everything on your site with a simple keyboard-first workflow.
    • pollify plugin logo

      Pollify- Ultimate Poll Creator Plugin for WordPress

      Build interactive polls, surveys & voting experiences in WordPress with the best Gutenberg-native poll plugin.
  • Docs
  • Blog
  • Contact Us
  • Login
Pricing
  • Zapier Is Costing You Too Much for WordPress Tasks

    The best Zapier alternative for WordPress is Krom Automation, a native plugin that automates the same triggers and actions Zapier handles for WordPress tasks, at a flat site licence fee with no per-task billing. Zapier Professional runs $240 a year for 750 tasks a month. A store processing 1,000 orders a month is already over that cap before accounting for any other automation on the site.

    That is not a knock on Zapier as a product. It does app-to-app work exceptionally well, and if your automation never touches WordPress directly, it is hard to beat. The problem is that most WordPress automation is deeply WordPress-native: a user registers, a form submits, an order completes. Running those events through a cloud intermediary adds cost, latency and a dependency on an external service staying online.

    This article models the real cost difference, explains where each tool wins honestly, and covers the migration steps that every other comparison article skips.

    Browse the full Krom Automation feature list to see exactly what the plugin handles natively before reading the cost breakdown below.

    What Zapier Actually Costs on a Busy WordPress Site

    Zapier prices by task. One trigger plus one action equals one task. A workflow with three actions equals three tasks per run. That math is invisible until your bill arrives.

    Here is what Zapier charges at the Professional tier against a flat Krom Automation site licence, modelled across three real traffic levels:

    Monthly Runs Zapier Professional (annual) Zapier Team (annual) Krom Automation Standard (annual, 5 sites)
    1,000 ~$240 (at limit of 750/mo, overage applies) ~$480 $199
    10,000 ~$600+ (requires higher plan) ~$960+ $199
    50,000 ~$2,400+ (enterprise tier) Custom pricing $369 (Enterprise, unlimited sites)

    Zapier’s 750-task Professional plan covers a single-step workflow firing 750 times. Add a second action to that workflow and you are already out of headroom at 375 orders. A three-step welcome sequence for new users, a WooCommerce order notification to Slack, and a weekly digest email can burn through a month’s allocation in under two weeks on a moderately active site.

    Krom Automation charges per site, not per run. The Standard plan at $199 a year covers 5 site activations regardless of how many workflows run or how many steps each workflow contains. At 50,000 monthly runs, the cost per thousand is less than $0.01.

    Per-task billing is not a pricing model. It is a penalty for your site growing.

    Where Zapier Genuinely Wins

    Zapier has 6,000-plus app integrations. If you need to connect Salesforce to HubSpot and neither system touches WordPress, Zapier is the right tool. No WordPress plugin can replicate that breadth of external app-to-app connectivity, and we are not going to pretend otherwise.

    Zapier also wins in these specific situations:

    • Multi-platform automation where the trigger and action both live outside WordPress entirely.
    • Legacy SaaS stacks with no native plugin support, where an HTTP webhook alone is not enough.
    • Teams that already have hundreds of Zaps and cannot absorb a migration project right now.
    • One-person operations running fewer than 100 tasks a month, where Zapier’s free tier covers everything.

    The honest answer is that Zapier and a native WordPress automation plugin are not always substitutes. Sometimes you need both. The question is which tasks belong on which tool.

    What a Native WordPress Plugin Does Differently

    A native plugin fires directly from the WordPress event, with no round-trip to an external server. When a user registers, the trigger fires inside PHP before the page response finishes. When a WooCommerce order status changes, the action runs in the same database transaction context. There is no webhook queue, no polling interval and no dependency on a third-party API staying available.

    Krom Automation builds workflows on a visual drag-and-drop canvas powered by ReactFlow. Each node is a trigger, action or condition. Connecting an “Order Completed” trigger to a “Send Email” action to a “Subscribe to Mailchimp” action takes under two minutes and produces a workflow you can read at a glance six months later.

    The free version includes 16 triggers, 21 actions and 20 ready-made workflow templates. That covers the most common WordPress automation scenarios without spending a cent. See how triggers, actions and workflows connect if you want the technical picture before installing.

    Workflow data, execution logs and API credentials stay in your own database. Nothing leaves your server unless you tell it to.

    The Capability Gap: What Each Tool Handles

    Automation Task Zapier Krom Automation
    WooCommerce order triggers Via webhook only (delay possible) Native, fires in real time
    WordPress user registration workflows Via webhook, requires setup Native trigger, no config needed
    Form submission to CRM Works for major forms with Zap Native triggers for Gravity Forms, WPForms, Fluent Forms, CF7, Ninja Forms, Elementor Forms
    App-to-app (no WordPress) Excellent, 6,000+ apps Not the right tool
    Execution logs per workflow step Paid tiers only Included free
    AI text generation in workflows Via OpenAI Zap (counts tasks) Built in free, bring your own key
    Conditional branching Yes, with filters Yes/No paths, included free
    Flat annual cost regardless of runs No Yes

    Common WordPress Automation Scenarios and Which Tool to Use

    The decision is not Zapier versus Krom Automation across the board. It is per workflow. Work through this list and assign each of your existing automations before doing anything else.

    • New user registered, send welcome email, tag in CRM: Krom Automation. Native trigger, zero webhook latency, no task cost per registration.
    • WooCommerce order completed, update inventory in an ERP not on this list: Zapier, if the ERP has a Zapier integration. Krom Automation’s HTTP Request action can also post to a REST endpoint if the ERP accepts it.
    • Form submitted, add to email marketing list: Krom Automation. Native integrations exist for Mailchimp, ConvertKit, MailerLite and ActiveCampaign without touching Zapier.
    • Salesforce updated, notify Slack channel: Zapier. No WordPress event is involved.
    • LearnDash course completed, issue certificate and enrol in next course: Krom Automation. The LearnDash integration handles enrollment, completion and quiz triggers natively.
    • Post published, share to social media: Krom Automation handles Facebook, Twitter/X and LinkedIn natively in Pro.

    How to Migrate Away from Zapier Without Breaking Things

    Every comparison article recommends switching. None of them explain how. Here is the process we would follow on a real site, in order of impact.

    Step 1: Audit your current Zaps before touching anything

    Log into Zapier and export or photograph a list of every active Zap. For each one, record: the trigger app, the action app, whether WordPress is involved on either end, and the average monthly task count. This audit typically takes 30 to 60 minutes on a site with 10 to 20 Zaps.

    Sort the list into three buckets:

    1. WordPress-native: both trigger and action touch WordPress or a WordPress plugin. These migrate fully to Krom Automation.
    2. WordPress-adjacent: one end is WordPress, the other is a third-party app. These may migrate to Krom Automation using the HTTP Request action or a Pro integration, but verify first.
    3. Fully external: no WordPress involvement. Keep these on Zapier or move them to Make.

    Step 2: Rebuild bucket one workflows first

    Install Krom Automation and build the WordPress-native workflows first. Run them in parallel with the existing Zaps for at least 7 days. The workflow simulator lets you dry-run a workflow with zero side effects before enabling it live.

    Check the execution log after 48 hours. Krom Automation logs every step of every run. If a step fails, the log names the step and the reason. Most Zapier users have never seen this level of per-step detail without paying for a higher tier.

    Step 3: Disable the Zap only after confirming parity

    Do not delete the Zap immediately. Pause it. Leave it paused for 14 days while the Krom Automation workflow runs live.

    Only delete when you are confident no edge case has been missed. The most common edge case is a Zap that only fires for specific post types or order statuses, which is easy to miss during a quick audit.

    Step 4: Handle data continuity for sequences

    If you had multi-step Zaps that included delays (for example, send an email 3 days after registration), users who entered that sequence before the migration will still be in the Zapier queue. Let Zapier finish those sequences rather than cancelling mid-flow. Set a cutoff date, stop new entries going into Zapier from that date, and let existing entries complete naturally. This avoids users getting no follow-up or getting it twice.

    Step 5: Cancel the Zapier plan at the right moment

    Cancel at the end of your billing cycle after the 14-day parallel run is clean. Cancelling mid-cycle wastes money and creates urgency that leads to mistakes. On a $240/year plan, the worst case is paying for one extra month while you verify the migration, which is a reasonable insurance cost.

    Hidden Costs and Limitations to Know Before You Decide

    We said we would cover what marketing pages omit. Here is the honest version for both sides.

    Zapier’s hidden costs:

    • Multi-step Zaps require a paid plan. The free tier is single-step only.
    • Filters and conditional logic count against task limits on some plans.
    • Polling intervals on free and low-tier plans mean a trigger may not fire for up to 15 minutes after the event.
    • Zap history retention is limited on lower plans, making debugging genuinely difficult.

    Krom Automation’s honest limitations:

    • Delays depend on WordPress Cron. On very low-traffic sites where no visitor arrives for hours, a scheduled action may fire late unless you configure a real server cron job.
    • AI actions require you to supply your own API key for OpenAI, Google Gemini or Groq. wpRigel never marks up tokens, but the key setup takes 10 to 15 minutes if you have not done it before.
    • App-to-app automation with no WordPress involvement is outside the scope of the plugin. The HTTP Request action covers many custom cases, but it is not a replacement for Zapier’s 6,000-app library.
    • Pro features including the incoming webhook receiver, schedule trigger and visual email builder require a paid plan starting at $119 a year for one site.

    A plugin that names its own limitations is a plugin you can trust in production.

    Krom Automation Pro: What the Upgrade Adds

    The free plugin covers the most common WordPress-native workflows. Pro extends it with 80-plus additional triggers, 60-plus additional actions and 24 integrations covering forms, e-commerce, CRM, email marketing, LMS, membership, messaging and social media. The total template library grows to 121 ready-made workflows.

    The three Pro features most relevant to former Zapier users are:

    • Incoming webhook receiver: a unique secret URL per workflow with HMAC-SHA256 signature verification and 9 security layers. Any external service that can send a POST request can trigger a Krom Automation workflow. See the incoming webhook documentation for setup steps.
    • Schedule trigger: run a workflow on a recurring schedule, hourly through monthly or a custom interval, without relying on a plugin-specific cron workaround.
    • AI workflow generation: describe an automation in plain English and get a working workflow in seconds. Useful for teams that know what they want but find the canvas unfamiliar at first.

    Pro plans carry a 14-day money-back guarantee. The free version is free forever with no run caps, no trial period and no feature locked behind an upgrade prompt.

    See the full comparison of free versus Pro features to decide which tier you actually need before buying.

    What the Numbers Say About WordPress Automation in 2026

    WordPress powers roughly 43% of all websites, and the majority of those sites run at least one automation today, whether it is a form-to-email connection or a full multi-step onboarding sequence. The shift toward self-hosted automation tools has accelerated as cloud billing models became harder to predict and data residency requirements tightened in regulated industries.

    The practical signal is simpler: the number of native WordPress automation plugins available in 2026 is higher than at any point before, which means site owners now have real choices rather than a forced migration to a cloud tool by default. The question is no longer whether to automate. It is where automation lives.

    Our Verdict: Who Should Switch and Who Should Not

    Switch to Krom Automation if your automation is primarily WordPress-native, your monthly runs exceed Zapier’s plan limits, or your execution logs are hidden behind a paywall tier you would rather not pay. The flat pricing model stops making sense to resist once you model your actual run volume against the per-task cost.

    Keep Zapier if your existing workflows are mostly app-to-app with no WordPress involvement, or if you are managing fewer than 100 tasks a month on the free tier. In those situations, a migration creates work without meaningful savings.

    Use both if your stack has a mix of WordPress-native and fully external automations. Move the WordPress tasks to Krom Automation, keep the external Zaps where they are and reduce your Zapier plan to a lower tier. That combination often costs less than either tool alone at full capacity.

    If you want to start without risk, download the free plugin from the WordPress.org plugin directory and build one workflow before committing to anything. The simulator lets you test it with no live impact.

    For a deeper look at what the plugin does across every tier, the honest Krom Automation review covers the free and Pro versions without pulling punches.

    See Krom Automation pricing and pick the plan that fits your site count. Every plan includes every Pro feature. The only variable is how many sites you activate it on.

    Frequently Asked Questions

    What is the best free Zapier alternative for WordPress?

    Krom Automation’s free version includes 16 triggers, 21 actions and 20 workflow templates with no run caps or paywalled features. It is the strongest free option for WordPress-native automation. For app-to-app tasks with no WordPress involvement, Make’s free tier is worth evaluating instead.

    Can I automate WooCommerce workflows without paying per task?

    Yes. Krom Automation includes WooCommerce Order Created and Order Completed triggers in the free version, plus Create Coupon and Update Order Status actions. The Pro version adds the WooCommerce Subscriptions integration and Easy Digital Downloads support. There are no per-task charges at any tier.

    Does Zapier work well with WooCommerce and Gravity Forms natively?

    Zapier requires a webhook or a third-party connector for most WordPress plugins. Gravity Forms has a Zapier add-on, and WooCommerce can push data via webhooks, but neither fires as immediately as a native plugin trigger. Latency of 5 to 15 minutes is common on lower Zapier tiers due to polling intervals.

    How long does it take to migrate from Zapier to Krom Automation?

    A site with 10 to 20 active Zaps typically completes a parallel-run migration in 2 to 3 weeks. The audit takes 30 to 60 minutes. Rebuilding workflows in the visual canvas averages 15 to 20 minutes each. Running both systems in parallel for 7 to 14 days before disabling Zapier is the step most people skip and later regret.

    Is Make (formerly Integromat) a better Zapier alternative than a WordPress plugin?

    Make is cheaper than Zapier for high-volume app-to-app automation and uses a scenario-based model rather than per-task billing. For WordPress-native triggers and actions, a native plugin outperforms both because there is no external API call, no polling delay and no dependency on a cloud service. Make and Krom Automation solve different problems and are not direct substitutes.

    What happens to my data if I cancel Zapier?

    Zapier retains your Zap history for a period after cancellation, but your task history, execution logs and Zap configurations are held on their servers. Krom Automation stores everything in your own WordPress database. You own the data, it does not leave your server, and cancelling a plan does not delete your logs.
    The wpRigel Team

    August 22, 2026
    Krom Automation
  • Krom Automation Review: Free and Pro, Honestly Assessed

    Krom Automation is a WordPress-native workflow automation plugin that lets you build visual “if this, then that” automations on a drag-and-drop canvas.

    The free version includes 16 triggers, 21 actions, built-in AI, and 20 ready-made templates. There are no run caps and no trial period. Pro plans start at $119 per year and unlock 80+ additional triggers, 60+ additional actions, and 24 integrations.

    We built Krom Automation because every other option forced you into a list-based rule editor or locked AI behind a paywall. Others sent your workflow data to someone else’s server.

    This review covers exactly what you get at each tier, how the plugin performs in practice, and where it genuinely will not be the right fit.

    If you want to see the full feature breakdown before reading further, browse the complete Krom Automation feature list.

    Quick Summary

    CategoryDetail
    Plugin typeVisual workflow automation for WordPress
    Free triggers16
    Free actions21
    Free templates20
    AI included freeYes, bring your own API key
    Pro triggers added80+
    Pro actions added60+
    Pro integrations24
    Pro templates total121 (20 free + 101 Pro)
    Pro pricing from$119/year or $299 lifetime
    Self-hostedYes, data stays in your database
    WP-Cron dependencyYes, affects delay accuracy on low-traffic sites

    What Does Krom Automation Actually Do?

    Krom Automation watches for events on your WordPress site and responds to them automatically. A user registers, an order completes, a post publishes. Instead of handling those moments manually or writing custom code, you build a workflow once and it runs every time.

    The workflow builder runs on a visual canvas powered by ReactFlow. You drag trigger nodes and action nodes onto the canvas, connect them, and the automation is live. There is no shortcode, no PHP snippet, and no separate dashboard login required.

    The full explanation of how triggers, actions, and workflows connect is in the documentation if you want the technical detail before installing.

    “The free version has no run caps, no trial period, and no features locked behind a paywall. You get all 16 triggers and all 21 actions the moment you activate it.”

    What Are the 16 Free Triggers?

    Triggers are the events that start a workflow. The free version includes 16 triggers across five categories.

    • User (7): User Registered, User Profile Updated, User Login, User Logout, User Role Changed, User Deleted, Password Reset
    • Post (4): Post Published, Post Updated, Post Deleted, Post Status Changed
    • Comment (2): Comment Submitted, Comment Approved
    • Media (1): Media Uploaded
    • WooCommerce (2): Order Created, Order Completed

    For most content sites, membership sites, and small WooCommerce stores, these 16 triggers cover the automations that matter most. The full free triggers reference documents every field and filter each trigger exposes.

    What Are the 21 Free Actions?

    Actions are what the workflow does after a trigger fires. The free version includes 21 actions across seven categories.

    • Email (1): Send Email
    • User (4): Create User, Update User Meta, Change User Role, Send Password Reset
    • Post (6): Create Post, Update Post, Update Post Field, Change Post Status, Add Post Meta, Delete Post
    • Comment (4): Add Comment, Update Comment Status, Add Comment Label, Add Comment Meta
    • HTTP Request (1): GET, POST, PUT, PATCH, and DELETE with JSON response parsing
    • AI (3): AI Generate Text, AI Content Moderation, AI Auto-Tag
    • WooCommerce (2): Create Coupon, Update Order Status

    The HTTP Request action is worth calling out specifically. It lets you send data to any external service that has an API, without needing a Pro plan or a dedicated integration. The free actions reference covers every available field.

    How Does the AI Work in the Free Version?

    AI is not a Pro feature. All three AI actions, Generate Text, Content Moderation, and Auto-Tag, are available in the free version from day one. You connect your own API key from your chosen provider. Every call goes directly from your site to that provider.

    We never charge per AI call and never mark up tokens. You pay your provider’s standard rate and nothing else.

    Supported providers in the free version:

    • OpenAI: GPT-4o Mini, GPT-4o
    • Google Gemini: Gemini 2.0 Flash, Gemini 2.5 Flash Preview, Gemini 2.5 Pro Preview
    • Groq: Llama 3.3 70B, Llama 3.1 8B

    The AI actions setup guide walks through connecting each provider and configuring prompts with merge tags.

    “Three AI actions, six supported models, zero additional cost from us. You own your API key and you pay your provider directly.”

    Other Free Features Worth Knowing

    Beyond triggers and actions, the free version includes a set of features that are often paywalled in competing tools.

    • Workflow simulator: Run a dry test with zero side effects before a workflow goes live
    • Execution logging: Full per-step audit trail for every workflow run
    • Analytics dashboard: Total executions, active workflows, estimated time saved, and a trend chart
    • Reports page: Date range filtering, success rate, per-workflow breakdown, CSV export
    • Conditional branching: Yes and No paths based on trigger data
    • Delay scheduling: Minutes, hours, days, weeks, or a custom number of seconds
    • Merge tags: Inject live event data into any action field dynamically
    • Run once per entity: Prevents duplicate executions on the same record
    • Import and export: Portable JSON for moving workflows between sites
    • Failure notifications: Email alerts plus automatic retry with configurable backoff
    • Full REST API: Under the krom-automation/v1 namespace
    • Background execution: Powered by Action Scheduler, nothing runs during page loads

    The workflow settings documentation covers run-once enforcement, notes, pausing, and import/export in detail.

    What Does Krom Automation Pro Add?

    Pro is an add-on that installs alongside the free plugin. It does not replace it. Every feature in the free version remains available after you activate Pro.

    Pro Trigger and Action Counts

    TierTriggersActionsTemplatesIntegrations
    Free1621200 dedicated
    Pro adds80+60+10124
    Total with Pro96+81+12124

    Pro-Exclusive Features

    • AI workflow generation: Describe an automation in plain English and get a working workflow in seconds
    • Visual email builder: Block-based, powered by the Gutenberg editor, no code required
    • Schedule trigger: Hourly, daily, weekly, monthly, custom interval, or one-time
    • Incoming webhook receiver: A unique secret URL per workflow with HMAC-SHA256 signature verification and nine security layers
    • Extended delay units and advanced branching

    The Pro features and integrations overview lists every trigger, action, and integration added at the Pro tier.

    Pro Integration Categories

    Pro adds 24 integrations across the following categories: forms, e-commerce, CRM, email marketing, LMS, membership, messaging, social media, data storage, productivity, and affiliate.

    A few examples worth naming specifically:

    • Email marketing: Mailchimp, ConvertKit, MailerLite, ActiveCampaign
    • Forms: FluentForms, WPForms, Gravity Forms, Contact Form 7, Elementor Forms, Ninja Forms
    • LMS: LearnDash, TutorLMS
    • Membership: MemberPress
    • Messaging: Slack, Discord, Twilio, Telegram
    • Productivity: Google Sheets, Google Calendar
    • Affiliate: AffiliateWP

    What Does Krom Automation Pro Cost?

    Every Pro plan includes every Pro feature. The only difference between plans is the number of sites you can activate on.

    PlanAnnualLifetimeSites
    Basic$119/year$2991 site
    Standard$199/year$4995 sites
    Enterprise$369/year$799Unlimited

    All Pro plans carry a 14-day money-back guarantee. The free version remains free forever with no limits applied. See the full pricing page for current details and any active offers.

    “Every plan includes every Pro feature. You are never choosing between feature sets, only between site counts.”

    What Are the Real Limitations?

    No automation plugin is right for every situation. Here is an honest account of where Krom Automation will not serve you well.

    WP-Cron Dependency

    Delays and scheduled workflows depend on WordPress Cron. On very low-traffic sites, WP-Cron fires late if no visitor arrives for hours. If your delays need to be precise, configure a real server-side cron job instead of relying on the default WordPress behaviour.

    WordPress-Native Only

    Krom Automation is built for WordPress. The trigger or the action needs to touch your WordPress site. If you need automation between two external services with no WordPress involvement, a general-purpose automation platform is the better fit.

    AI Requires Your Own API Key

    The AI actions are free to use, but they are not plug-and-play out of the box. You need to create an account with OpenAI, Google, or Groq and supply a valid API key. There is no built-in AI credit system.

    Migration Cost from Existing Platforms

    Teams with hundreds of existing flows on an external automation platform will face real migration work. Krom Automation does not import from other tools. Each workflow needs to be rebuilt on the canvas.

    Who Should Look Elsewhere

    • Sites automating purely between external services with no WordPress involvement
    • Teams already deeply invested in another platform with no appetite to migrate
    • Very simple single-step needs that a lighter plugin could handle with less setup

    How Does Krom Automation Compare to Other WordPress Automation Tools?

    Most WordPress automation tools fall into one of two camps. Some use a list-based rule editor, which is simple but becomes hard to follow once a workflow has more than three or four steps. Others offer a visual canvas but charge extra for AI, analytics, or advanced branching.

    FeatureKrom Automation FreeTypical Competitor Free
    Visual canvas builderYesRarely
    AI actionsYes (3 actions, 6 models)Usually Pro only
    Execution logsYes, full audit trailOften limited or absent
    Analytics dashboardYesOften Pro only
    Workflow simulatorYesRarely free
    Run capsNoneCommon
    Self-hosted dataYesDepends on plugin
    HTTP Request actionYesSometimes Pro only

    For a direct side-by-side comparison with named alternatives, see the full comparison page.

    System Requirements and Installation

    Krom Automation has modest requirements that most WordPress hosts meet by default.

    • WordPress 6.2 or higher
    • PHP 7.4 or higher
    • MySQL 5.7+ or MariaDB 10.2+
    • WooCommerce is optional, required only for the two WooCommerce triggers and two WooCommerce actions

    The plugin creates nine custom database tables on activation. Background jobs run through Action Scheduler, so workflow execution never blocks a page load. The installation guide walks through every step.

    Free vs Pro: Is the Free Version Enough?

    For a single WordPress site handling user registrations, post publishing, comments, and basic WooCommerce orders, the free version covers the automations most sites actually need. The analytics, logging, AI, and workflow simulator are all included at no cost.

    Pro makes sense when you need to connect to a specific third-party service, use the schedule trigger for recurring jobs, or accept incoming webhooks from external platforms. The free vs Pro comparison documents every difference.

    Adoption and Market Context

    Workflow automation in WordPress is a growing category. The broader no-code automation market has expanded sharply since 2023 as teams look to reduce manual admin work without hiring developers. WordPress-native tools are gaining ground because they keep data on the site’s own server rather than routing it through a third-party cloud.

    Krom Automation sits in a specific position: a self-hosted, visual, AI-included tool built entirely for WordPress. There is no SaaS subscription for the core product and no per-execution billing at any tier. That combination is genuinely rare in the current tool landscape.

    Frequently Asked Questions

    Does the free version expire or have a trial period?

    No. The free version is free forever with no trial period, no run cap, and no features that revert after a set number of days. Install it free from WordPress.org and use it indefinitely.

    Do I need to install both the free and Pro plugins?

    Yes. Pro is an add-on that runs alongside the free plugin. The free plugin must be installed and active first. The Pro installation guide covers the exact steps.

    Can I use Krom Automation without WooCommerce?

    Yes. WooCommerce is entirely optional. The two WooCommerce triggers and two WooCommerce actions simply do not appear in your workflow builder if WooCommerce is not active. All other triggers and actions work without it.

    Is my workflow data sent to wpRigel’s servers?

    No. Krom Automation is self-hosted. Workflow definitions, execution logs, and API credentials are stored in your own WordPress database. Nothing is transmitted to our servers.

    What happens if a workflow fails?

    Krom Automation sends an email notification when a workflow execution fails. It then retries automatically with configurable backoff. Every attempt is recorded in the execution log so you can see exactly which step failed and why.

    Can I move workflows between sites?

    Yes. Workflows export as portable JSON files. You can import that file into any other WordPress site running Krom Automation. The workflow settings documentation explains the process.

    Does the schedule trigger require Pro?

    Yes. The schedule trigger lets you run workflows on a recurring interval or at a specific time. It is a Pro-exclusive feature. The free version supports delay scheduling within a workflow, but not a standalone time-based trigger.

    Is Krom Automation Worth It?

    The free version is genuinely competitive with what other plugins charge for. Sixteen triggers, 21 actions, three AI actions, a visual canvas, full execution logs, and analytics at no cost is a strong starting point. The absence of run caps alone separates it from most alternatives in the same category.

    Pro is the right upgrade when your workflows need to reach third-party services like Mailchimp, Slack, LearnDash, or Google Sheets. At $119 per year for a single site, it covers the cost quickly if it replaces even one or two hours of manual work per month. Compare all three Pro plans and pick the one that matches your site count.

    If you want to start without any commitment, get the free plugin from WordPress.org and build your first workflow today.

    The wpRigel Team

    August 20, 2026
    Krom Automation
  • How to Require Login to Vote in WordPress Polls (Pollify User Guide)

    How to Require Login to Vote in WordPress Polls (Pollify User Guide)

    Running a poll where anyone can vote 50 times by clearing their browser cookies is not feedback – it is noise.

    If you are making content decisions, product decisions, or community decisions based on poll results, you need to know that every vote came from a real, authenticated person. Not the same person voting from three different browsers.

    Pollify‘s login restriction feature solves this at the account level. When enabled, only logged-in WordPress users can vote – and each user gets exactly one vote, tracked by their user ID, not their IP address or browser cookie.

    This guide walks through the complete setup, what visitors see on the frontend, and which use cases make login-restricted polls the right call.

    New to Pollify? Install the free plan from WordPress.org first – no account required.

    Login restriction requires Pollify Pro.

    Why Voting Restriction Matters for Poll Data Quality

    Most polls on the open web use one of two protection mechanisms: IP address tracking or browser cookies. Both are better than nothing. Neither is reliable enough for polls where the results actually matter.

    IP tracking fails in any shared-network environment. An office of 40 people shares one outbound IP – meaning only one person from that office can vote, blocking 39 legitimate respondents. Conversely, anyone on mobile data can switch from WiFi to cellular to get a fresh IP and vote again. VPNs bypass IP restrictions entirely with one click.

    Cookie tracking is even weaker. Clearing browser cookies takes ten seconds. Switching to incognito mode takes one. Using a different browser takes zero additional effort if it is already installed. Cookie-based “one vote per person” enforcement stops honest visitors from accidentally voting twice. It does not stop anyone motivated to vote more than once.

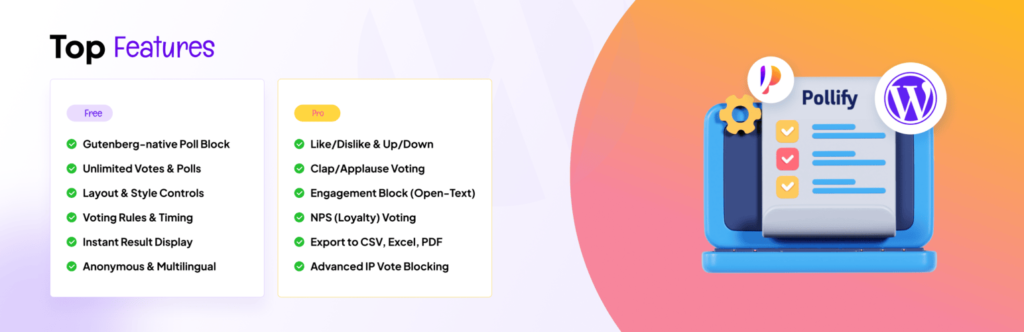
    Pollify-plugin-banner with top features mention

    The result: unverified polls produce data you cannot confidently act on. Is that 70% preference result real, or did three enthusiastic people vote 15 times each? You cannot know.

    User account-based restriction eliminates this uncertainty. A WordPress user account requires registration. Voting twice requires two accounts. Voting 15 times requires 15 accounts.

    At that point, the effort required to manipulate the poll exceeds any reasonable motivation to do so. The data becomes trustworthy enough to make real decisions from.

    Methods to Restrict Voting in WordPress Polls

    Before jumping into the Pollify setup, it helps to understand the landscape of restriction options and where each fits.

    • Cookie restriction (Pollify free): Sets a browser cookie after voting. Stops accidental double-voting and honest visitors. Easily bypassed by clearing cookies or using incognito. Right for casual content polls where the audience is trusted.
    • IP restriction (Pollify Pro): Blocks repeat votes from the same IP address. More reliable than cookies – survives browser clearing and incognito mode. Still bypassed by VPN or mobile data switching. Has the shared-IP false positive problem. Good as a secondary layer, not as the primary mechanism.
    • Login restriction (Pollify Pro): Requires a WordPress user account to vote. Duplicate prevention switches from IP/cookie tracking to user account tracking. Each authenticated user gets one vote tied to their identity. The strongest available mechanism for high-stakes polls.
    • One vote per user (Pollify Pro): Works alongside login restriction to enforce account-level deduplication. When combined, login restriction controls who can vote; one-vote-per-user controls how many times.

    For casual blog polls where you just want a rough sense of reader preference, cookie restriction is fine and completely free. For any poll feeding a real decision – product roadmaps, membership votes, course feedback, employee surveys – login restriction with one-vote-per-user is the setup you want.

    How to Require Login to Vote in WordPress with Pollify

    Login restriction is built directly into the Response Settings panel of every Pollify block. There is nothing to configure globally – you enable it per poll, giving you full control over which polls require authentication and which don’t. For a full technical reference, see the official login restriction documentation.

    Step 1: Install and Activate Pollify

    If you haven’t installed Pollify yet, go to Plugins > Add New in your WordPress dashboard, search for Pollify, and install the free plugin from WordPress.org. Activate it. Then activate your Pro license key under Pollify > License – login restriction is a Pro feature available in all paid plans from $79/yr.

    Step 2: Open Your Poll in the Block Editor

    Open the post or page containing your Pollify block – or create a new one. If you haven’t set up a poll before, see our guide on how to create a poll in WordPress.

    Login restriction works across all Pollify block types: standard polls, Kudos, Up/Down voting, NPS surveys, and Engagement blocks.

    Step 3: Enable “Require Login to Vote”

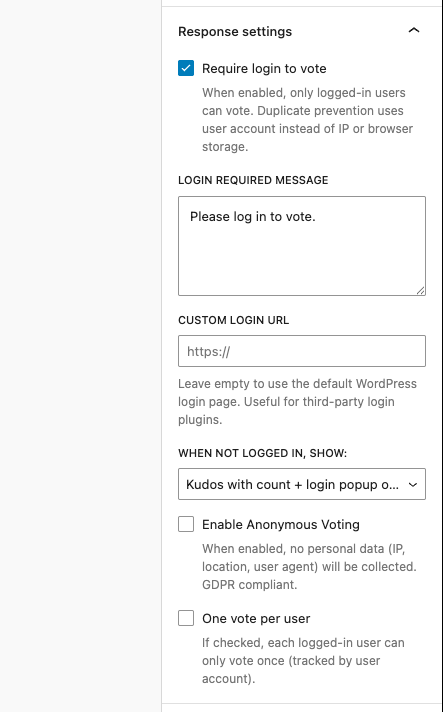
    Click on the Pollify block to select it. In the right-hand settings panel, find the Response Settings section and expand it. Check the “Require login to vote” checkbox.

    Pollify Response Settings panel showing require login to vote checkbox and related settings in the WordPress block editor

    Once checked, three additional options appear below the checkbox. From this moment, non-logged-in visitors can no longer submit votes. Duplicate prevention automatically switches from IP/cookie tracking to user account tracking for all new votes on this poll.

    Step 4: Customise the Login Required Message

    The Login Required Message field controls what non-logged-in visitors see when they try to interact with the poll. The default is “Please log in to vote.” – clear and functional.

    Adjust this to match your site’s context and tone. Some examples that work better than the generic default:

    • For membership sites: “Members only – please log in to cast your vote.”
    • For WooCommerce: “Sign in to your account to share your feedback.”
    • For course platforms: “Enrolled students only – log in to participate.”
    • For employee surveys: “Please log in with your team account to respond.”

    The message appears alongside a clickable Login link that redirects visitors to your login page. Keep the message short and action-oriented – it should help the visitor understand what to do in one read.

    Step 5: Set a Custom Login URL (When Needed)

    By default, the Login link points to your standard WordPress login page at /wp-login.php. For most sites this is fine. Leave the Custom Login URL field empty unless you are using a third-party login page.

    If your site uses WooCommerce’s My Account page as the login portal, a custom login page built with MemberPress, Paid Memberships Pro, or any other membership plugin – enter that page URL here. Visitors will be sent to your custom login flow instead of the default WordPress login screen, keeping the brand experience consistent.

    Step 6: Choose What Non-Logged-In Visitors See

    The “When Not Logged In, Show” dropdown gives you three options for how the poll appears to unauthenticated visitors. This is a meaningful UX decision – choose based on whether social proof and poll visibility matter for your context.

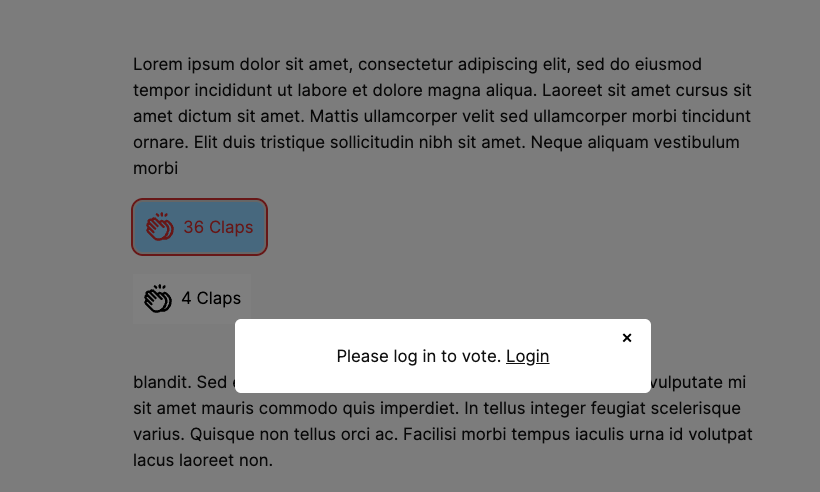
    • Poll with login popup on click: The poll block is fully visible including current results or engagement counts. When the visitor clicks to interact, a popup appears with the login message and link. The least intrusive option – visitors see social proof before being prompted to log in.
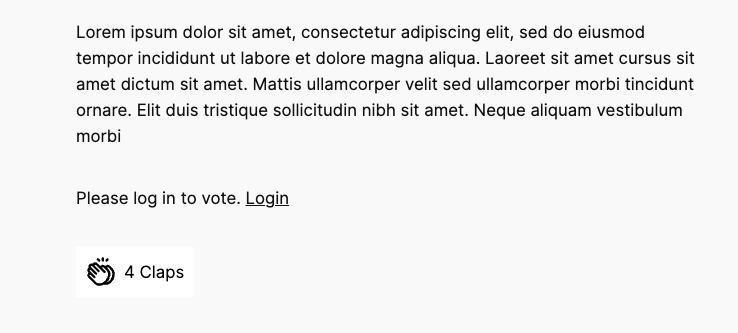
    • Poll with inline login message: The poll block is visible, but a persistent inline message (“Please log in to vote. Login”) sits directly in the content flow near the block. No popup – the message is always visible without requiring interaction first.
    • Login message only (hide the block): The poll content is completely hidden. Only the login message and link are shown. Use this when the poll content itself is private – internal surveys, member-only questions, or anywhere seeing the options before logging in would undermine the purpose.

    Click Update to save. Your poll now requires authentication to vote.

    How to Limit One Vote Per User in WordPress Polls

    Login restriction controls who can vote. The “One vote per user” checkbox in the same Response Settings panel controls how many times each authenticated user can vote.

    Enable it and each logged-in user can submit one vote. Their second attempt shows the current results without a vote option – the same experience as someone who has already voted in a cookie-restricted poll, but backed by user account tracking instead of browser storage. There is no workaround available to the user short of registering a second account.

    See one vote per user setting at the footer of the below attached screenshot-

    Pollify Response Settings panel with require login to vote and one vote per user both enabled for maximum poll security

    Tip: Always enable both “Require login to vote” and “One vote per user” together. Login restriction without one-vote-per-user still allows the same authenticated user to vote multiple times. One-vote-per-user without login restriction falls back to cookie tracking, which is weaker. The combination gives you the strongest data integrity available in Pollify.

    The combination also unlocks a future capability: because votes are tied to user accounts, you can filter and segment results by user role. Seeing how administrators responded versus subscribers, or how customers in one tier responded versus another, becomes possible when the data is account-linked.

    How It Looks on the Frontend

    Popup Login Prompt

    When a non-logged-in visitor clicks on a poll block set to popup mode, a clean overlay appears on the page showing the login message and a Login link. The poll content and any engagement counts remain visible in the background. The popup includes a close button so visitors can dismiss it without leaving the page.

    Pollify login restriction popup showing login prompt overlay on a Kudos voting block for logged-out visitors

    This mode works well for blogs, product pages, and community posts where showing the current vote count or engagement number is part of the value. Visitors see social proof, understand others have participated, and get a clear invitation to join by logging in.

    Inline Login Message

    In inline mode, the login message sits persistently within the page content near the poll block. The poll or voting interface is visible but non-interactive. The message does not require a click to trigger – it is always there for logged-out visitors.

    Pollify inline login restriction message displayed above a Kudos block for non-logged-in visitors

    Inline mode suits documentation pages, course content, and any layout where a popup appearing mid-content would feel disruptive. The message integrates naturally into the reading flow.

    Hidden Block (Login Message Only)

    When set to hide the block, logged-out visitors see only the login message and link – nothing of the poll itself. This is the right choice when the poll question or options are sensitive, internal, or intended exclusively for authenticated users.

    Employee surveys, member-only votes, and private beta feedback polls all benefit from this mode.

    Restrict Poll Voting in WordPress with Pollify: Real-World Use Cases

    Login restriction is not a one-size-fits-all requirement. Here are the specific scenarios where it changes data quality from unreliable to trustworthy.

    Use CasePoll TypeWhy Login Matters
    Membership community voting on site decisionsStandard PollEach paying member gets exactly one verified vote
    WooCommerce post-purchase NPSNPS SurveyOnly real customers with accounts provide satisfaction scores
    Online course lesson feedbackKudos / Engagement BlockOnly enrolled students can respond – not random visitors
    Internal employee pulse surveyUp/Down VotingResponses tied to real team member accounts
    SaaS feature prioritisationStandard PollVotes from actual users, not anonymous visitors or competitors
    Blog post appreciation trackingKudosKnow which logged-in readers found content valuable for segmentation

    Combining Login Restriction with Other Pollify Security Features

    Login restriction is the strongest single mechanism, but it works even better as part of a layered approach.

    • IP blocking (Pro): If a specific IP address is sending spam votes or suspicious activity on public-facing polls, you can block it directly from the Pollify dashboard. See IP blocking documentation for setup. For login-restricted polls, IP blocking adds a secondary layer against coordinated account-based manipulation attempts.
    • Anonymous voting: You can enable login restriction and anonymous voting simultaneously. The vote is tied to the user account for deduplication purposes, but no additional personal data (IP address, location, user agent) is stored. This is the right configuration for GDPR-sensitive contexts where you need one-vote-per-person without creating a data trail. See anonymous poll setup guide.
    • Poll scheduling: Set a close date alongside login restriction for time-bounded research windows. Scheduled login-restricted polls are particularly clean for quarterly NPS surveys and membership renewal votes – you get a defined collection window with account-verified responses. See poll scheduling guide.

    Frequently Asked Questions

    Can I require login for all poll types in Pollify – Kudos, NPS, Up/Down voting?

    Yes. Login restriction works across every Pollify block type: standard polls, Kudos, Up/Down voting, NPS surveys, and Engagement blocks. The setting is in the Response Settings panel for each block and applies the same login gate regardless of block type.

    Does login restriction work with WooCommerce or MemberPress login pages?

    Yes. Enter your custom login page URL in the Custom Login URL field within Response Settings. Visitors who need to log in will be directed to your WooCommerce My Account page, your MemberPress login, or any other custom login URL you specify – instead of the default WordPress login screen. Leave the field empty to use the default /wp-login.php.

    How is one-vote-per-user tracked – by IP or by user account?

    When login restriction is enabled, duplicate prevention switches from IP/cookie tracking to user account tracking. Each WordPress user ID can submit one vote. This tracking is tied to the authenticated session – it cannot be bypassed by clearing cookies, switching browsers, or using incognito mode. A second vote would require a second WordPress user account.

    Can I allow anonymous voting while still requiring login?

    Yes – these are independent settings. “Require login to vote” ensures the voter is authenticated before their vote is accepted. “Enable anonymous voting” controls whether personal data (IP address, location, user agent) is stored alongside the vote. You can require login for deduplication while enabling anonymous voting to avoid storing any additional identifying data. This combination is useful for GDPR-sensitive polls.

    What do visitors see if they are not logged in?

    It depends on the display mode you choose in the “When Not Logged In, Show” dropdown. Popup mode shows the full poll block with a login prompt appearing when the visitor clicks to interact. Inline mode shows the poll block with a persistent login message always visible. Hide mode shows only the login message – the poll content is not visible at all until the visitor authenticates. Choose based on whether showing poll content to logged-out visitors serves your goals.

    Conclusion on How to Require Login to Vote in WordPress

    If your polls feed real decisions – product direction, community votes, customer feedback, employee sentiment – the data needs to be trustworthy. Cookie and IP restriction are useful for casual polls with a trusted audience. For anything more serious, login restriction with one-vote-per-user is the right standard.

    Pollify makes this setup straightforward: one checkbox enables login restriction, a second enables one-vote-per-user, and three display modes give you control over the visitor experience. The whole configuration takes under two minutes per poll, works across all Pollify block types, and produces data you can actually act on.

    Install Pollify free from WordPress.org for cookie-restricted polls. Upgrade to Pollify Pro (from $79/yr) for login restriction, IP blocking, one-vote-per-user, NPS surveys, image polls, and one-click export. Full feature documentation is at wprigel.com/pollify.

    Related Guides

    • How to Create a Poll in WordPress: No-Code Tutorial
    • How to Prevent Duplicate Votes in WordPress Polls
    • How to Create an Anonymous Poll in WordPress
    • How to Schedule WordPress Polls to Auto-Open and Auto-Close
    • Pollify vs Crowdsignal: Voting Restriction Compared
    • Pollify Docs: Voting Rules, Timing, and Confirmation Messages
    • Pollify Docs: IP Blocking for WordPress Polls

    The wpRigel Team

    May 15, 2026
    Pollify
  • What Is a Command Palette? And Why Every WordPress User Needs One

    What Is a Command Palette? And Why Every WordPress User Needs One

    The command palette is one of the most borrowed ideas in modern software. VS Code has one. Figma has one. Linear has one. Notion has one. Slack has one. GitHub has one.

    If you spend time in professional tools, you almost certainly already use one somewhere in your daily workflow.

    In every case, the idea is the same: press a keyboard shortcut, type what you want to do, and do it. No menu hunting. No mouse-driven navigation. No remembering where a setting is buried. Just type and act.

    WordPress introduced one since version 6.9– but with important limitations that most users do not know about. And a generation of third-party plugins has emerged to fill the gaps that the built-in version leaves open.

    This guide explains what a command palette actually is, how it works in WordPress specifically, where the built-in version falls short, and what a dedicated command palette plugin like Commandify adds to the picture.

    What is a Command Palette in WordPress Actually?

    A command palette is a search-driven interface that accepts typed input and returns matching commands, content, or navigation targets. You activate it with a keyboard shortcut, usually Cmd+K on Mac or Ctrl+K on Windows. A text box appears. You start typing. Results appear as you type, filtered in real time by what you have entered.

    The results are not just links. They are actions. “Publish this post.” “Clear cache.” “Open order #4521.” “Edit product: Blue Running Shoes.” Each result is something you can do, not just somewhere you can go.

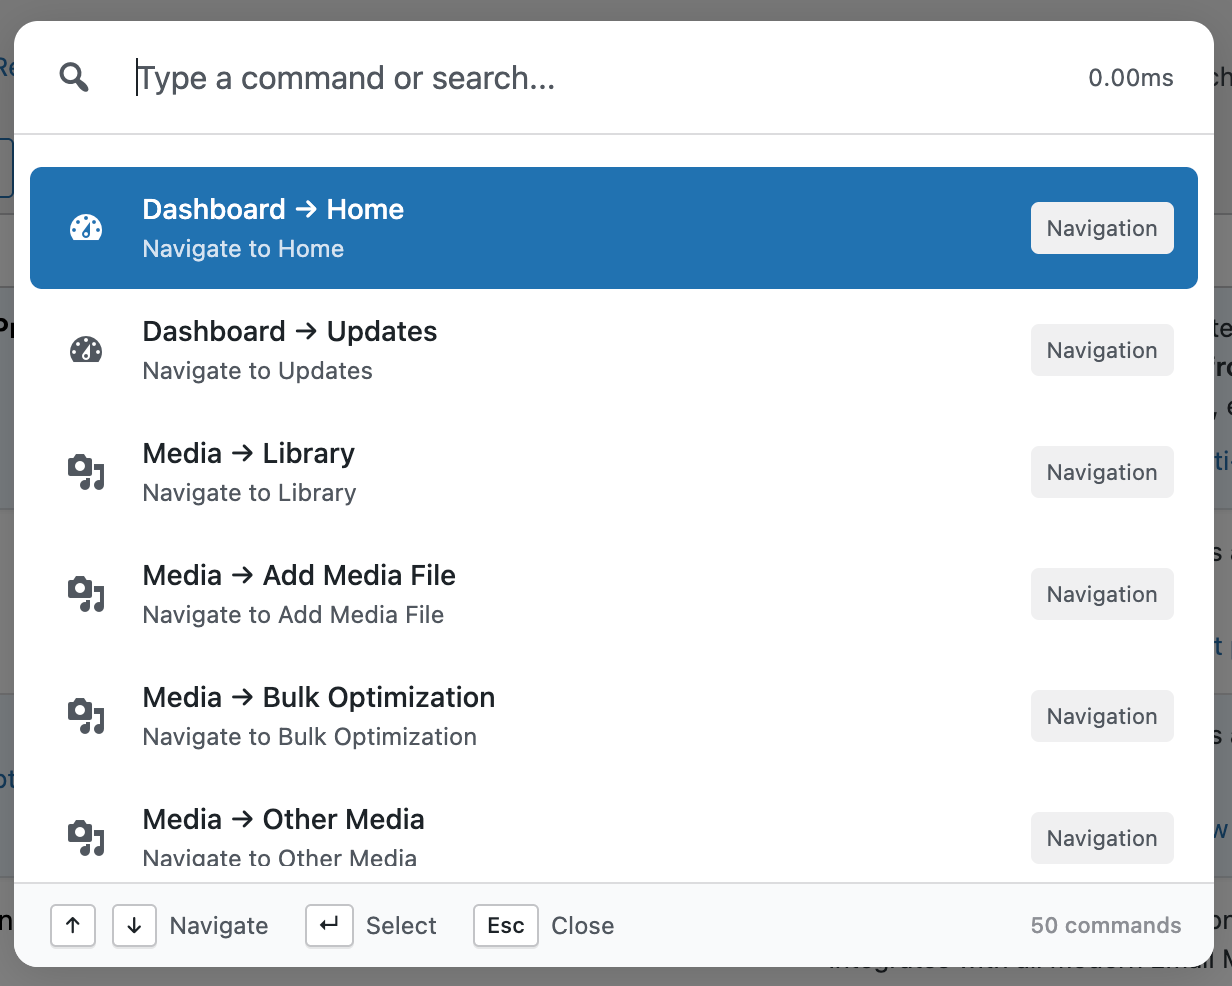
    commandify command palette dashboard

    The term “command palette” comes from the programming world. Visual Studio Code popularised it as the way to access every editor function without memorising every keyboard shortcut or hunting through menus.

    You press Cmd+Shift+P, type a fragment of what you want, and the matching command appears. The pattern proved so effective that it spread rapidly into other tools until it is now a near-universal feature of professional software.

    The underlying principle is simple: searching is faster than navigating when you know what you want. A menu assumes you will browse to discover options. A command palette assumes you already know what you are looking for and just need to get to it instantly.

    The WordPress Built-In Command Palette

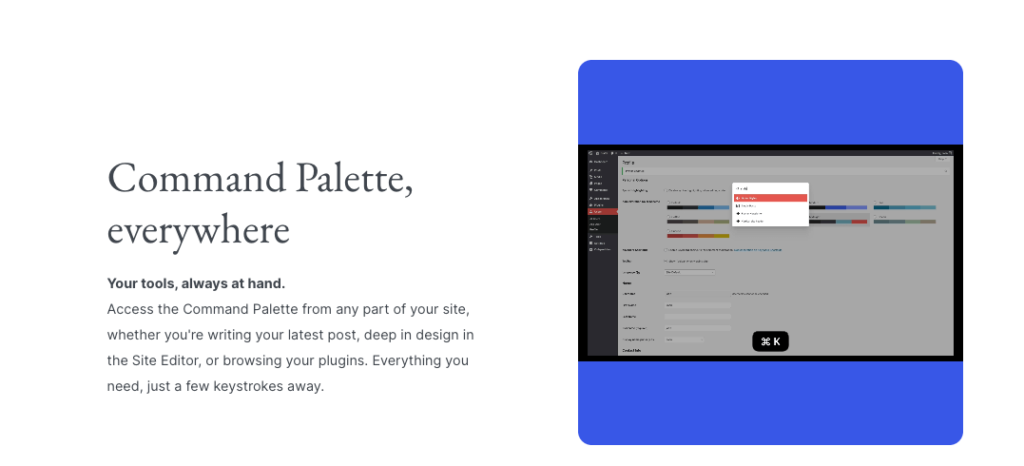
    WordPress added a native command palette in version 6.3, released in August 2023. It is accessible anywhere in the WordPress editor via Cmd/Ctrl + K. In WordPress 6.9, the palette expanded further across more admin screens.

    The built-in palette is genuinely useful for certain tasks. Inside the block editor or site editor, you can navigate between templates, insert blocks, toggle editor preferences, add custom CSS, reset template customisations, and jump between pages and posts by typing their name.

    wordpress 6.9 introduces core command palette

    For content creators who spend most of their time in the editor, it reduces a meaningful amount of friction.

    But it has significant boundaries. As the WordPress command palette limitations guide covers in depth, the core palette is editor-focused. It does not cover WooCommerce. It does not cover plugin management.

    It does not cover user accounts or bulk maintenance tasks. It is not available on most standard wp-admin screens outside the editor context. And it offers no integration with the page builders, form plugins, or e-commerce tools that most WordPress sites actually depend on.

    For someone whose WordPress life extends beyond writing posts, the built-in palette covers a portion of their daily work and leaves the rest unchanged.

    Why WordPress Admin Navigation Is a Problem Worth Solving

    To understand why a command palette matters for WordPress specifically, it helps to understand what WordPress admin navigation actually looks like for someone who manages a non-trivial site.

    A typical WordPress admin menu has somewhere between 20 and 60 top-level and second-level menu items, depending on how many plugins are installed. A WooCommerce store adds its own section with Orders, Products, Customers, Reports, and Settings, each with multiple nested tabs.

    Page builders like Elementor and Bricks add their own menu sections. Security plugins, SEO tools, caching plugins, form plugins- each adds to the menu.

    Navigating this by clicking is slow by nature. Finding an order requires: clicking WooCommerce, clicking Orders, waiting for the page to load, entering a search term, clicking the result. That is five steps minimum.

    Repeat this thirty times a day for different orders and you have spent a surprising amount of time on navigation alone, for zero productive output.

    A command palette replaces that entire sequence with: Cmd+K, type order number, press Enter. Two actions. The page loads directly on the record you needed. The arithmetic of daily friction is completely different.

    What a Dedicated WordPress Command Palette Plugin Adds

    Third-party command palette plugins for WordPress exist precisely because the built-in palette covers the editor use case well but leaves everything else untouched.

    The most capable of these is Commandify, which is available as a free plugin on WordPress.org with a Pro tier that extends deeply into WooCommerce and page builder workflows.

    Commandify-wordpress.org-banner

    Here is what a full-featured WordPress command palette plugin covers that the built-in version does not.

    Full Admin Navigation from Any Screen

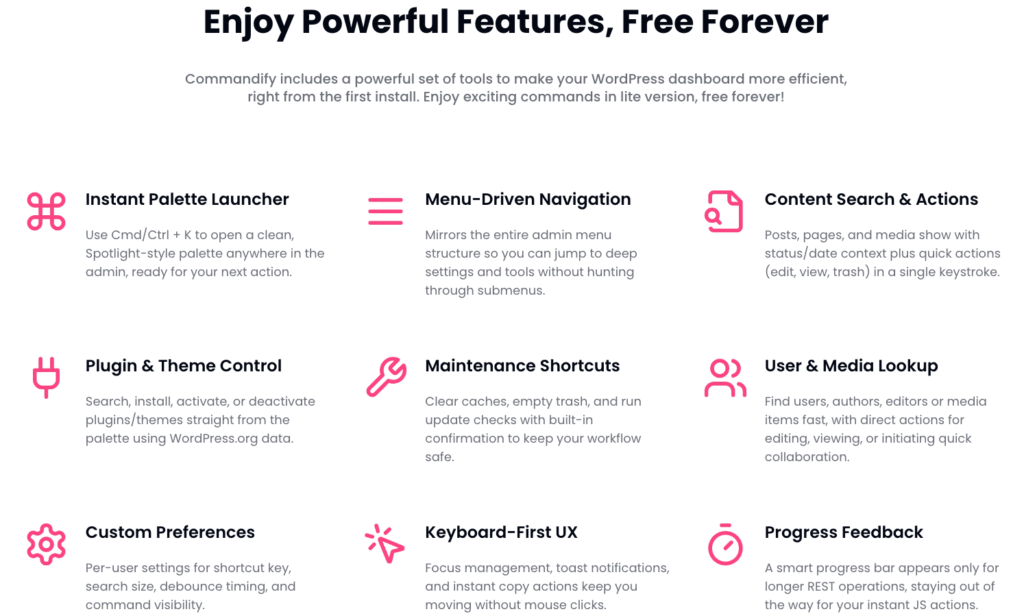
    Unlike the core palette, which is constrained to the block editor context, Commandify is available on every screen in wp-admin from a single consistent shortcut. Cmd/Ctrl + K works whether you are on the dashboard, a WooCommerce screen, a plugin settings page, or anywhere else in the admin.

    The palette mirrors your complete menu structure (every plugin, every nested page, every settings section) so anything reachable by clicking is reachable by typing.

    Content Search With Context

    Type a post title fragment and the matching posts appear with their status, date, and author shown alongside. You can edit, view, preview, or trash the post directly from the result without opening it first.

    The same applies to pages, media items, custom post types, and any other registered post type on the site. Search results include enough context to confirm you have the right record before you act on it.

    User Lookup

    Type a name or email address and matching user accounts appear. Open the user profile, check their order history, or manage their account from the palette result.

    For membership sites, learning management systems, or any site with significant user accounts, this replaces the process of navigating to Users, searching manually, and scrolling through results. The guide on switching WordPress users and handling user issues faster covers this workflow in detail.

    Maintenance Commands

    Commandify Free includes maintenance actions accessible directly from the palette: clear cache, flush rewrite rules, clean transients, regenerate thumbnails, and similar housekeeping tasks.

    These are actual operations, not links to settings pages. Press the shortcut, type “clear cache,” press Enter. Done. No plugin settings screen required.

    WooCommerce Command Suite (Pro)

    Commandify Pro’s WooCommerce integration is the feature that most distinguishes it from every other option in this space, including the WordPress core palette, Turbo Admin, and any other command palette plugin currently available.

    Pattern recognition identifies what you have typed without requiring you to specify a search category. A hash-prefixed number (#4521) is recognised as an order ID. An email address triggers a customer lookup.

    how to manage woocommerce orders products and customers faster with commandify

    A known SKU format opens the matching product variation. Actions available on each record (status changes, order notes, stock adjustments) are accessible from within the palette result without opening the full admin screen for that record.

    The full scope of the WooCommerce command suite is covered in the WooCommerce management guide. For store managers handling daily orders and customers, the productivity difference is significant and immediate from the first day of use.

    Who Benefits Most from a WordPress Command Palette

    The honest answer is: anyone who spends more than a few hours per week inside wp-admin. But the benefits scale with how much you use the admin and how complex your site is.

    WooCommerce store managers who handle daily orders and customer queries see the most dramatic improvement. Every lookup that previously required five navigational steps becomes a two-keystroke action. For high-order-volume stores, this is hours recovered per week, not minutes.

    Agency developers who manage multiple client sites benefit from the speed of navigating to any admin screen without remembering where each plugin puts its settings. The fuller the plugin ecosystem, the more confusing the menu structure, and the more useful the command palette becomes as an alternative to that structure.

    Content editors who publish regularly benefit from the built-in WordPress palette for editor navigation, and from a plugin like Commandify for cross-site and cross-content-type navigation beyond the editor context.

    Developers building client sites benefit from maintenance commands and plugin management from the palette, reducing the time spent on setup and housekeeping tasks during site builds.

    If you manage a simple one-page site and visit the admin once a week to publish a post, a command palette plugin is not a high-priority addition. If WordPress admin is part of your daily professional workflow, the question is not whether a command palette is worth it- it is which one fits your workflow best.

    The Learning Curve

    The most common reaction from new users of command palette tools is: “Why didn’t I have this earlier?” The pattern of pressing a shortcut and typing is immediately intuitive for anyone who has used a search engine, a code editor, or Spotlight on macOS. There is no training required to understand the basic interaction.

    The efficiency gains compound with use. In the first week, you are still sometimes falling back to menu clicks for things you cannot immediately recall the name of. By the second week, most common actions feel faster through the palette.

    By the fourth week, using WordPress without a command palette starts to feel unnatural in the way that using a computer without copy-paste would feel unnatural.

    The fuzzy search in Commandify makes this transition even smoother. You do not need to type the exact name of what you are looking for. Type “woo order” and WooCommerce order screens appear. Type “elem temp” and Elementor templates appear.

    The palette matches fragments and partial strings, so you get results even before you remember the exact wording of what you need.

    How to Get Started in Two Minutes

    The fastest way to understand what a command palette feels like is to install one and use it.

    Install Commandify free from WordPress.org. Activate it. Press Cmd/Ctrl + K from anywhere in your WordPress admin. Type the name of any admin page- “plugins,” “users,” “settings,” or the name of a post you know exists on the site.

    Watch the results filter as you type. Press Enter on the result you want.

    That is it. You now understand what a command palette does for WordPress. The rest is a matter of which features matter for your specific site and whether the free version covers your needs or whether the Pro version’s WooCommerce and page builder integrations are worth the upgrade.

    The 14-day money-back guarantee means there is no risk in finding out.

    FAQs on What is A Command Palette

    Is the command palette only for power users and developers?

    No. The command palette is actually more accessible than keyboard shortcuts because you do not need to memorise anything. You just type what you want in plain language. “New post,” “clear cache,” “view orders”- these all work.

    Any WordPress user who can type a search query can use a command palette from day one without any learning investment.

    Does WordPress have a built-in command palette?

    Yes. WordPress added a built-in command palette in version 6.3 (August 2023), accessible with Cmd/Ctrl + K inside the block editor and site editor. WordPress 6.9 expanded it to more admin screens.

    However, it is focused on the editor context and does not cover WooCommerce, plugin management, user lookup, maintenance tasks, or most third-party plugin functionality.

    Many users install a dedicated command palette plugin like Commandify to cover the complete wp-admin surface area that the core palette does not reach. The command palette limitations article covers the specific gaps in detail.

    What is the keyboard shortcut for the WordPress command palette?

    For the built-in WordPress palette: Cmd + K on Mac, Ctrl + K on Windows, within the block or site editor. For Commandify: the same Cmd/Ctrl + K shortcut, available on every wp-admin screen.

    The shortcut is configurable in Commandify Pro if you prefer a different key combination. Turbo Admin uses a different default shortcut but also allows customisation through your browser profile settings.

    Will a command palette plugin slow down my WordPress site?

    No. Commandify loads its scripts exclusively in wp-admin, for authenticated admins only. It adds nothing to the public-facing site for regular visitors. The plugin uses client-side filtering for most search results, which means no additional server requests are made per keystroke.

    Longer operations like cache clearing or database maintenance display a progress indicator while they run. There is no measurable frontend performance impact.

    What is the difference between a command palette and WordPress keyboard shortcuts?

    Keyboard shortcuts require memorisation. You press a specific combination of keys to trigger a specific pre-assigned action. If you do not remember the shortcut, you cannot use it. A command palette requires no memorisation- you type what you want in natural language and the palette finds it for you.

    The command palette is also more flexible: it surfaces dynamic content like specific posts, orders, and users based on what is actually in your site, which static keyboard shortcuts cannot do.

    The two tools complement each other; a full guide to WordPress keyboard shortcuts covers the shortcuts worth memorising alongside a command palette workflow.

    The wpRigel Team

    March 28, 2026
    user guides
  • How to Speed Up WordPress Admin Dashboard: 9 Fixes That Actually Work

    How to Speed Up WordPress Admin Dashboard: 9 Fixes That Actually Work

    Here are the 9 proven ways to Speed Up WordPress Admin Dashboard with ease!

    A slow WordPress admin dashboard is one of those problems that compounds quietly. One second of loading time per page does not feel serious. Across twenty admin page loads per day, it is twenty seconds.

    Across a working month, it is meaningful time and more importantly, it is accumulated friction that degrades the quality of the work you do inside the admin.

    The problem is also commonly misdiagnosed. Many WordPress speed guides treat admin speed as an extension of frontend speed and recommend the same fixes: get a CDN, install a caching plugin, optimise your images.

    These have zero effect on wp-admin. The admin is authenticated, dynamic content that bypasses every frontend caching layer.

    This guide covers what actually works. Nine specific fixes, each explained precisely, each targeted at the admin environment rather than the frontend. We also address the category of slowness that no technical fix touches: workflow speed, which is about how many steps it takes you to do things inside the admin rather than how long those steps take to load.

    Before You Start: Understand Which Type of Slowness You Have

    WordPress admin slowness comes in two distinct forms. Applying the wrong category of fix wastes your time and leaves the actual problem unsolved.

    Technical slowness: Admin pages take a long time to fully load. You click a menu item and wait two, three, or five seconds before the page arrives. The bottleneck is server processing, database query time, or poorly written plugin code running on every page request.

    Workflow slowness: Pages load quickly but reaching what you need still requires too many steps. Five clicks to check an order. Seven clicks to get to a plugin settings screen. Searching through a list of 400 posts to find the one you want to edit. The admin is technically fast; the process is the problem.

    Both types are addressed below. Fix 1 targets workflow slowness directly, which is often the higher-value fix and takes two minutes. Fixes 2 through 9 address technical slowness in order of impact.

    Fix 1: Install a Command Palette for Instant Workflow Speed

    This is the fastest fix with the highest day-one impact and requires no server access, no plugin configuration, and no technical knowledge.

    Commandify adds a command palette to wp-admin. Press Cmd/Ctrl + K from any admin screen and a search bar opens. Type the name of any admin page, post, user.

    Or, with Commandify Pro– any WooCommerce order, product, or customer. The result appears instantly. Press Enter and you are there.

    The free version covers full admin navigation, content search across all post types, user lookup, plugin and theme management, and maintenance commands like cache clearing and database cleanup.

    Install it free from WordPress.org and try pressing Cmd/Ctrl + K within sixty seconds of activation.

    For WooCommerce stores, Commandify Pro adds a full WooCommerce command suite. Type an order number, a customer email, or a product SKU and it recognises the pattern automatically and opens the correct record.

    Change order statuses, add notes, and adjust product stock from within the palette itself without visiting the corresponding admin screens. The WooCommerce management guide walks through this in detail.

    If you are managing WordPress sites with complex admin menus from many plugins, or running a WooCommerce store with daily orders, this single fix will have a more noticeable effect on your daily experience than any server-side optimisation.

    Fix 2: Identify Slow Plugins Using Query Monitor

    Before changing your hosting, upgrading your PHP version, or touching your database, do this diagnostic step. A single poorly written plugin can add two to four seconds to every admin page load, making your admin feel slow regardless of how good your hosting is. Query Monitor finds it in 30 minutes.

    Query Monitor is a free WordPress plugin that exposes the full performance picture of any page load. Install it, visit the admin screen that feels slowest, and open Query Monitor from the toolbar. Navigate to “Queries by Component.” This view shows every database query made during the page load, grouped by the plugin or theme that generated each query.

    A healthy admin page load involves somewhere between 30 and 80 database queries. If one plugin is generating 150, 200, or 400 queries on a single page load, it is your culprit.

    Common offenders are security plugins running file scans on every admin page view, analytics plugins computing complex reports in real time, backup plugins triggering during business hours, and old or abandoned plugins with poor caching of their own queries.

    Once identified: deactivate the plugin and reload the page. If the admin speed improves significantly, you have confirmed the source. Your options are to replace the plugin with a more efficient alternative, reach out to the developer, or check whether there is a setting to limit when the plugin runs its intensive operations.

    Uninstall Query Monitor after your diagnostic session. It is a diagnosis tool, not a permanent installation.

    Fix 3: Upgrade PHP to 8.2 or 8.3

    PHP is the language WordPress runs on. Every admin page load, every plugin function call, and every database interaction goes through PHP. Newer PHP versions process all of this faster. PHP 8.2 benchmarks approximately 25-35% faster than PHP 7.4 on typical WordPress workloads. PHP 8.3 improves further. For sites still on PHP 7.x, this is likely the highest-impact server-side improvement available.

    Check your current PHP version at WooCommerce → Status → Server Information, or at Tools → Site Health → Info → Server.

    If you are on PHP 7.4 or below, upgrading is urgent from both a performance and a security standpoint. PHP 7.4 reached end-of-life in November 2022, meaning it no longer receives security patches.

    On most quality managed hosts (Kinsta, WP Engine, SiteGround, Cloudways, Rocket.net) PHP version selection is a dropdown in your hosting dashboard.

    Select PHP 8.2 or 8.3, save, and the change applies immediately. Test your site over the next 24 hours for any plugin compatibility issues. In rare cases an older plugin may not support PHP 8.x syntax, but the vast majority of actively maintained plugins have been updated for compatibility.

    Fix 4: Enable Object Caching (Redis or Memcached)

    Page caching saves rendered HTML pages for anonymous visitors and deliberately bypasses wp-admin. If you have only ever installed a page caching plugin, you have not done anything for admin speed from a caching perspective.

    Object caching is different. It stores the results of database queries in server memory (RAM). When WordPress needs the same data again, it retrieves it from RAM instead of querying the database again. Every admin page load benefits because the admin makes many repeated database queries.

    Redis is the industry-standard object cache for WordPress. Memcached is an older alternative still offered by some hosts. The setup process depends on your hosting environment. On Kinsta, enable Redis in the Kinsta dashboard under your site’s tools. On Cloudways, toggle Redis in your application settings. On SiteGround, enable Memcached or Redis in Site Tools.

    On WP Engine, contact support for Redis add-on options. Once enabled at the hosting level, follow your host’s instructions to connect it to WordPress- typically done through your host’s own plugin or a dedicated Redis plugin.

    Do not attempt to configure Redis manually on shared hosting without confirmed host support. A misconfigured object cache causes more problems than it solves. Most quality managed hosts offer it with one-click enablement.

    Fix 5: Regulate the WordPress Heartbeat API

    The WordPress Heartbeat API runs in the background of wp-admin and sends regular AJAX requests to your server. It powers autosave functionality in the post editor, post locking when multiple editors are active, and some plugin notification systems. By default it fires a request every 15 seconds while you have an admin page open.

    On most sites, that default is more frequent than necessary. On shared hosting with limited server resources, multiple admin tabs open simultaneously can produce what effectively becomes a sustained stream of server requests from your own browser. This consumes CPU and can cause the admin to feel sluggish under what should be very light load.

    The Heartbeat Control plugin (free on WordPress.org) lets you set the Heartbeat interval separately for the dashboard, the post editor, and the frontend, without editing any code. The recommended approach: set the dashboard to 60 seconds (the maximum), keep the post editor at 30 seconds to retain reliable autosave, and disable the frontend heartbeat entirely unless a specific plugin requires it. This configuration reduces Heartbeat-related admin-ajax.php calls by roughly 60 to 75% compared to defaults.

    Do not disable Heartbeat completely in the post editor. Doing so removes autosave protection while you are writing. The risk of losing content is not worth the marginal performance improvement.

    Fix 6: Clean Dashboard Widgets and Admin Notices

    The WordPress dashboard loads several default widgets that make outbound HTTP requests to external servers: the WordPress news widget fetches data from WordPress.org, some plugin widgets fetch remote data from their own servers, and marketing notifications from various plugins load content from external APIs. Each of these is a blocking HTTP request that your server makes before the dashboard finishes rendering.

    Remove or disable any dashboard widgets you do not actively use. From the WordPress dashboard, click Screen Options at the top right and uncheck any widget section you do not need. For more aggressive cleanup, Admin Notices Manager (free on WordPress.org) consolidates admin notices into a dedicated panel so they do not fire their loading overhead on every admin page view.

    Additionally: if you have WooCommerce installed, the WooCommerce admin dashboard loads remote inbox notifications from WooCommerce’s servers by default. Disable WooCommerce Bloat (free on WordPress.org) removes these with checkboxes, eliminating the outbound HTTP request they generate on every WooCommerce admin page load.

    Fix 7: Optimise Your Database

    WordPress databases accumulate overhead over time. Post revisions from years of content editing. Expired transients that cron jobs failed to clean up. Orphaned metadata from deleted posts and users. Tables left behind by plugins you removed months ago. Autoloaded data in the wp_options table growing beyond a healthy size.

    None of this causes dramatic slowness individually. Accumulated over a year or more on a busy site, it meaningfully increases the time it takes to execute common database queries. The wp_options table is particularly important:

    WordPress loads all autoloaded options on every single page request. A bloated wp_options table with megabytes of autoloaded data from old plugins slows every page load proportionally.

    WP-Optimize handles database cleanup through a safe, previewed interface. Before removing anything it shows exactly what will be deleted.

    Start with expired transients, post revisions, orphaned metadata, and spam comments. Also use the built-in WordPress tools: go to Tools → Delete Revisions if available, and WooCommerce → Tools → Clear transients and clear customer sessions if you run WooCommerce.

    After cleanup, run the WP-Optimize table optimisation to rebuild indexes and reclaim space. On a site that has been running for two or more years without a database cleanup, this step alone often produces a noticeable admin speed improvement.

    Fix 8: Disable WP-Cron and Replace with a Real Cron Job

    WordPress’s built-in WP-Cron system runs scheduled tasks — plugin updates checks, scheduled post publishing, email notifications, cache rebuild triggers — by piggybacking on page views. Every time any visitor or admin loads any page, WordPress checks whether any scheduled tasks are pending and runs them if so.

    On a busy site, this creates a consistent overhead on every page load. On a quiet site, it means scheduled tasks only run when pages are loaded, which can delay them unpredictably. Neither behaviour is ideal.

    The fix is to disable WP-Cron and replace it with a true server cron job that runs independently on a schedule you control. Add define('DISABLE_WP_CRON', true); to your wp-config.php file to disable the default system.

    Then create a server cron job in your hosting control panel (cPanel, Cloudways, Kinsta, or via SSH) that calls your site’s cron URL every 10-15 minutes: wget -q -O /dev/null "https://yourdomain.com/wp-cron.php?doing_wp_cron".

    Your hosting provider’s documentation will have specific instructions for creating cron jobs in their environment.

    This change removes the WP-Cron overhead from every single page load and replaces it with clean scheduled execution at the server level. On sites with many scheduled tasks running through plugins, the admin speed improvement is noticeable.

    Fix 9: Limit Admin Screen Items Per Page

    WordPress admin list tables — the posts list, pages list, users list, WooCommerce orders list, products list — default to displaying 20 items per page. Many users increase this through Screen Options to reduce pagination clicks, setting it to 50, 100, or more items per page.

    This seems efficient but has a cost. Loading 100 items on a WooCommerce orders list means 100 database queries for order data, 100 queries for order metadata, and potentially additional queries for custom columns added by plugins. On a store with thousands of orders, a list set to 100 items per page can add several seconds to the orders list load compared to the default 20 items.

    Check your Screen Options setting on your most-used list screens. Set them back to 20 unless you have a specific reason to see more at once.

    If your main need is finding specific records quickly rather than scanning through lists, a command palette like Commandify is a better tool for that purpose: it finds specific records in under two seconds without loading a large paginated list at all.

    What Does Not Speed Up Your WordPress Admin

    These recommendations appear regularly in WordPress speed guides and are simply not relevant to the admin environment.

    Page caching plugins. WP Rocket, LiteSpeed Cache, W3 Total Cache, and every other page caching plugin explicitly skips wp-admin for authenticated users. They are designed this way by intent. Installing or optimising a page cache has zero effect on admin page load times.

    CDN for the admin. Content delivery networks route frontend static asset delivery through geographically distributed servers. Admin pages are dynamic, authenticated PHP responses that do not go through CDN layers. A CDN setup change will not improve admin speed.

    Image optimisation. Compressing and converting images improves frontend page load speed for visitors. The admin does not serve your product images or post images to visitors. Image file size has no relationship to admin page load time.

    Increasing PHP memory limits. Unless your admin pages are crashing with out-of-memory errors, increasing the memory limit does not speed anything up. Memory limit affects stability under peak load, not baseline performance. If your admin is slow but not crashing, the memory limit is not the constraint.

    Prioritised Action Plan

    FixTypeTime RequiredImpactDo First If…
    Install Commandify freeWorkflow2 minutesHigh immediatelyAlways, the fastest visible improvement
    Run Query Monitor diagnosticTechnical30 minutesVery high if problem plugin foundAdmin pages are slow for all users
    Upgrade PHP to 8.2+Technical5 minutesHigh if currently on PHP 7.xPHP version is below 8.1
    Enable Redis object cachingTechnical10 minutesHigh on busy sitesOn quality managed hosting
    Regulate Heartbeat APITechnical10 minutesMedium on shared hostingOn shared/budget hosting
    Clean dashboard widgetsTechnical10 minutesLow-mediumDashboard specifically feels slow
    Database cleanup (WP-Optimize)Technical20 minutesMedium on older sitesSite is 12+ months old
    Disable WP-CronTechnical20 minutesMedium on busy sitesSite has many scheduled tasks
    Reduce items per pageTechnical5 minutesMedium on large list screensOrder/product/post lists are slow

    FAQs on How to Speed Up WordPress Admin Dashboard

    Why is my WordPress admin slow but my frontend is fast?

    This is the most common pattern and it has a specific explanation. Your frontend is fast because it is being served from a page cache that pre-rendered pages serve to visitors without hitting PHP or the database. Your admin bypasses all caching.

    Every admin page load is a live PHP and database operation. When the admin is slow but the frontend is fast, the problem is either application-level: a slow plugin, database bloat, no object caching, or a PHP version that is well behind current. The Query Monitor diagnostic step is the right starting point.

    Does switching hosts actually improve admin speed?

    Sometimes, but not always. If you are on shared Apache hosting with no object caching, switching to LiteSpeed-based hosting with Redis can produce a very significant admin speed improvement because the server architecture handles PHP and database workloads much more efficiently.

    However, if the cause of your slowness is a badly coded plugin, a bloated database, or PHP 7.4, none of those problems are fixed by switching hosts. Always diagnose with Query Monitor before spending money on a hosting migration.

    How much does fixing the WordPress admin speed actually matter for SEO?

    Admin speed has no direct relationship with your search rankings. Google’s Core Web Vitals measure frontend performance for visitors, not authenticated admin sessions. The value of a fast admin is entirely about your own productivity and operational efficiency.

    A slow admin does not hurt your rankings, but it does slow down the work you do to improve your site, which has an indirect compounding effect on every other aspect of your workflow.

    Is it safe to disable WP-Cron?

    Yes, provided you replace it with a server-level cron job. WP-Cron is not a service that runs independently- it is a hook that fires on page loads.

    Disabling it and configuring a real cron job is strictly better: your scheduled tasks run at consistent, predictable intervals rather than being dependent on page traffic, and every page load is freed from the cron-check overhead.

    The only risk is if you disable WP-Cron without setting up a replacement cron job, in which case no scheduled tasks will run. Follow the setup process in Fix 8 completely before deactivating WP-Cron.

    The wpRigel Team

    March 28, 2026
    user guides
  • Best WordPress Productivity Plugins in 2026 (Focused on Admin Workflow)

    Best WordPress Productivity Plugins in 2026 (Focused on Admin Workflow)

    “Best WordPress productivity plugins” articles have a recurring problem. Most of them are lists of generally useful WordPress plugins that happen to be popular: SEO tools, security plugins, backup solutions, image optimisation.

    These are valuable, but they are not productivity plugins. They are site-management plugins. The distinction matters.

    A productivity plugin has one job: reduce the time and effort required for the person managing the site to get things done inside wp-admin. It is not about what the site does for visitors. It is about how much faster and less frustrating it is to operate the site from the inside.

    With that definition established, this list is entirely different from the standard roundups. Every plugin here is evaluated against one question: does it save the site manager meaningful time or effort in their daily or weekly workflow? Nothing else qualifies.

    Category 1: Navigation and Daily Admin Speed

    Commandify: Best Command Palette for WordPress

    Free on WordPress.org. Pro from $47/year.

    The single highest-impact productivity plugin for WordPress admin users in 2026, and the starting point for any honest discussion of WordPress workflow improvement. Commandify adds a command palette to wp-admin accessible via Cmd/Ctrl + K from any screen. Type what you need and act on it immediately. No menu navigation, no page loads between steps.

    The free version covers everything non-WooCommerce users need: complete admin navigation that mirrors your full menu structure, content search across all post types with edit and view actions inline, user lookup by name or email, plugin and theme management, and maintenance commands including cache clearing and database cleanup.

    It is hard to overstate how different the admin experience feels after using this for a week. Menu navigation starts to feel like a previous era of workflow that you did not realise was slow until you stopped doing it.

    Commandify Pro adds the WooCommerce command suite, which is in a different category entirely. It does not just search for WooCommerce records — it uses pattern recognition and fuzzy search to identify what you have typed and infer what you need. A hash-prefixed number is automatically treated as an order lookup. An email address becomes a customer lookup.

    A SKU format opens the correct product variation. Actions on each result — status changes, order notes, stock adjustments — are available without visiting the underlying admin screen. For store managers, the full WooCommerce workflow makes this the tool with the clearest return on investment in this entire list.

    Pro also adds Elementor template access, Bricks Builder integration, CF7/Flamingo and Fluent Forms support, dark mode, and per-user configuration options. For agencies building and maintaining sites on these tools, the integration depth is something no other command palette plugin provides. See the Elementor template management and Bricks Builder management guides for workflow specifics.

    Best for: Everyone. The free version belongs on every WordPress site. Pro pays for itself within the first week for anyone managing WooCommerce orders, Elementor sites, or any admin-heavy workflow. Install free on WordPress.org or see Pro pricing here.

    Category 2: Content and Editorial Workflows

    PublishPress Planner- Best Editorial Calendar

    Free version available. Pro from $99/year.

    WordPress’s default content management is a flat chronological list with no visual planning layer. If you publish content on a schedule — blog posts, product updates, course modules, news articles, the absence of a calendar view means every publication decision requires manually checking dates across multiple post-list screens.

    PublishPress Planner adds a drag-and-drop editorial calendar where scheduled content is visible at a glance across days and weeks. You can drag a post from one date to another to reschedule it, see all post types across a unified calendar view, and assign content to team members from within the calendar. For content teams or solo publishers maintaining a regular publishing cadence, this makes the difference between having a plan and having chaos.

    The Pro version adds custom content statuses beyond the default draft/pending/published set, email and Slack notifications when post statuses change, and editorial comments that persist in the post sidebar for team communication. For teams where content goes through review cycles before publishing, the custom statuses and notifications significantly reduce the need to communicate about content status through external channels.

    Best for: Any site with a regular publishing schedule and more than one person involved in content decisions. Solo publishers also benefit from the visual scheduling view even without the team features.

    Duplicate Post- Best for Content Templates and Repurposing

    Free on WordPress.org.

    Duplicate Post adds “Clone” and “New Draft” actions to the post and page list screens. Clone creates an immediate copy of any post including all its metadata, custom fields, and featured image. New Draft creates a copy and opens it for editing immediately.

    For sites with consistent post structures — review sites that follow a template, product sites with standardised page layouts, news sites with recurring content formats — duplicating a well-structured existing post and editing it is dramatically faster than building from scratch each time. It is also the simplest way to create reusable page templates without requiring a page builder or custom post type setup.

    Yoast SEO acquired this plugin in 2021 and maintains it actively. It works with all custom post types, respects custom fields, and integrates cleanly with WooCommerce products if you need to duplicate product structures.

    Best for: Any site with recurring content formats that follow a consistent structure. Essential for agencies delivering the same content page type across multiple client sites.

    Category 3: Bulk Operations and Data Management

    Smart Manager- Best for Bulk Editing Across All Content

    Free version available. Pro from $149/year.

    WooCommerce’s native editing interface requires opening each product individually to edit it. For a store with 300 products that needs a 10% price increase across one category, doing this one product at a time is hours of repetitive work. Smart Manager replaces this with a spreadsheet-style grid view of any post type (products, variations, orders, coupons, users, or custom post types) where you can filter, sort, and edit directly in the grid.

    Bulk edits in Smart Manager support formulas and conditions. Increase all products in category X by 15%. Set all products with stock below 5 to out-of-stock. Update all published posts in a specific category to use a different author. These operations that would take hours manually complete in minutes through the grid.

    The Pro version adds an activity log that records who changed what and when. For teams where multiple people edit product or order data, this auditability is often a non-negotiable requirement. It also adds support for WooCommerce Subscriptions and Bookings if you use those extensions.

    Best for: WooCommerce stores with 100+ products, sites with large post archives requiring periodic bulk updates, and any team environment where multiple people edit shared data.

    Category 4: Admin Interface Improvements

    Admin Menu Editor- Best for Decluttering the Admin Menu

    Free version available. Pro from $25 one-time.

    Every plugin installed on a WordPress site adds its own items to the admin menu. After five or ten years of a site’s life, the admin menu typically contains 30 to 50 items, the majority of which most users never access. This menu clutter increases the cognitive load of every visit to the admin, makes navigation by scanning slower, and creates confusion for non-technical users like clients or content editors.

    Admin Menu Editor lets you reorder, rename, hide, or restrict any menu item through a drag-and-drop interface. Hide the menu items your users never need. Rename items to match the language your team uses. Move frequently-used items to the top of the menu. Restrict items to specific user roles so that editors only see what they need.

    This is especially valuable for client handoff. A client who only needs to manage posts and WooCommerce orders does not need to see the full plugin menu, the theme settings, the SEO plugin configuration, or the dozens of other items installed for your development workflow. Admin Menu Editor lets you create a clean, role-appropriate experience without building a custom admin from scratch.

    Best for: Agencies handing off sites to clients, sites with non-technical content editors, and anyone whose admin menu has grown unwieldy after years of plugin accumulation.

    WP Dashboard Notes- Best for In-Admin Documentation

    Free on WordPress.org.

    When you hand a site off to a client, or when multiple people manage a site, institutional knowledge about how the site works tends to live in someone’s head or in an external document that nobody reads. WP Dashboard Notes adds sticky notes directly to the WordPress dashboard that specific user roles can see.

    The practical use is straightforward: add a note to the dashboard explaining how to use the custom checkout workflow, what not to change in the WooCommerce settings, which plugins should never be auto-updated without testing, or how the editorial process works for this particular site. Everyone who logs in sees this information in context, without needing to know where the external documentation lives.

    Best for: Agencies managing multiple client sites, sites with rotating or part-time content contributors, and any situation where site-specific knowledge needs to be accessible in context.

    Category 5: Site Maintenance and Health

    WP-Optimize- Best for Database Maintenance

    Free version available. Pro from $49/year.

    Database maintenance is the routine task that most WordPress sites never receive. Post revisions accumulating from years of content editing. Expired transients from plugin data that was supposed to clean itself up. Tables left behind by plugins that were deleted months ago. All of this overhead adds query time to every admin page load in a way that compounds gradually and invisibly.

    WP-Optimize handles database cleanup through a safe, preview-first interface. It shows exactly what it will remove before anything is deleted. It also goes beyond what standard cache plugins offer for database work: it identifies and removes orphaned tables from plugins you have already uninstalled, which most other cleanup tools miss. Pair it with a UpdraftPlus backup before running a full cleanup on an older site — WP-Optimize integrates with UpdraftPlus directly and can trigger a backup before any cleanup operation.

    Run database cleanup quarterly on any site more than a year old. On sites that have gone through significant plugin testing and removal, run it immediately. The admin speed improvement on a site with several years of accumulated database overhead is consistently noticeable.

    Best for: Any site more than 12 months old, especially sites where multiple plugins have been installed and removed over time.

    WP Crontrol- Best for Debugging Scheduled Tasks

    Free on WordPress.org.

    WordPress’s cron system is invisible by default. Tasks are scheduled in the background and run without any admin-facing reporting. This makes it impossible to know whether cron jobs are running correctly, what is scheduled to run and when, or whether a plugin has registered a task that is firing far more frequently than it should.

    WP Crontrol makes the cron schedule visible. You can see every scheduled task, when it last ran, when it is next scheduled to run, and what it does. You can manually trigger any task to verify it is working. You can identify and remove tasks registered by plugins you have already deleted but that left their cron entries behind. For diagnosing unexplained admin slowness or site behaviour that occurs at inconsistent intervals, WP Crontrol is often the tool that provides the answer.

    Best for: Developers maintaining complex sites with multiple plugins, or anyone investigating unexplained periodic behaviour or performance issues.

    The Right Stack by User Type

    The plugins above do not all apply equally to every WordPress user. Here is how to think about building your productivity stack based on what your actual workflow looks like.

    Solo Content Creator or Blogger

    Start with Commandify Free for admin navigation and Duplicate Post for efficient content creation. Add PublishPress Planner if you maintain a regular publishing schedule that you need to see visually. WP-Optimize quarterly for database health. These four tools cover your workflow entirely. Total cost: free, or close to it.

    WooCommerce Store Manager

    Commandify Pro is the anchor plugin here; the WooCommerce command suite is why. Add Smart Manager when bulk product or order editing becomes a time sink. WP-Optimize quarterly. If you process customer service requests, consider adding a dedicated user management workflow built around Commandify’s user lookup feature before adding more plugins.

    Keep the stack lean and direct. WooCommerce sites already carry a high plugin overhead; every additional plugin has a performance cost that must be justified by the workflow benefit it delivers.

    Agency Developer Managing Multiple Client Sites

    Commandify Pro on sites where WooCommerce or page builder integration is needed. Admin Menu Editor on every client site for clean, role-appropriate admin experiences. WP Dashboard Notes for site-specific documentation that clients and contributors see in context. WP-Optimize on a quarterly maintenance schedule. WP Crontrol in your toolkit for diagnosing issues, not as a permanent install on every site.

    Content Team With Multiple Editors

    Commandify Free for admin navigation. PublishPress Planner Pro for editorial workflow management, custom statuses, and team notifications. Duplicate Post for template-based content creation. Admin Menu Editor to keep non-essential menu items out of editors’ views. The combination of a visible calendar and clean admin navigation removes the two most common friction points in multi-person WordPress content workflows.

    Best WordPress Productivity Plugins: Tools That Do Not Belong on This List

    These are included in most “productivity plugin” roundups and are worth calling out directly.

    SEO plugins (Yoast, Rank Math) are workflow tools for content optimisation, not admin productivity tools. They improve what you produce, not how quickly you produce it.

    Backup plugins (UpdraftPlus, BackupBuddy) are site-safety tools. They protect your work; they do not accelerate it.

    Security plugins (Wordfence, Sucuri) protect your site. They do not reduce the time it takes to manage it — in fact, poorly configured security plugins are one of the most common causes of a slow WordPress admin.

    Form plugins (Gravity Forms, WPForms, Fluent Forms) are features added to the site for visitors. They become workflow tools only in combination with a command palette that gives you fast access to form entries. On their own, they are functionality plugins, not productivity plugins.

    The distinction matters because every plugin installed adds some overhead to the admin. Installing plugins that do not actually save you workflow time has a real cost in administrative complexity and performance. Be selective.

    FAQs on Best WordPress Productivity Plugins

    How many productivity plugins is too many for a WordPress site?

    There is no magic number, but the test for each plugin is the same: does it remove a specific friction point you experience regularly? If you cannot identify the specific problem it solves for your workflow, it does not belong on your site.

    For most users, three to five genuinely productivity-focused plugins, combined with quality site infrastructure, covers everything. More plugins beyond that point tend to add overhead without proportional benefit.

    Is Commandify only useful for WooCommerce stores?

    No. The free version is broadly useful for any WordPress site and any user who spends regular time in wp-admin. The WooCommerce command suite in Commandify Pro is the feature with the highest return for store managers specifically, but the admin navigation, content search, user lookup, and maintenance commands in the free version are valuable across all site types.

    Publishers, agency developers, membership site managers, and LMS administrators all benefit from the core command palette functionality independently of the WooCommerce features.

    Do productivity plugins slow down the WordPress frontend?

    None of the plugins on this list load anything on the public-facing frontend. Commandify loads scripts in wp-admin only, for authenticated administrators. PublishPress Planner, Smart Manager, Admin Menu Editor, WP Dashboard Notes, WP-Optimize, and WP Crontrol are all admin-only tools.

    Your visitors are not affected by any of them. Always verify this with new plugin additions using a tool like Query Monitor to confirm where scripts are loading.

    What is the difference between a productivity plugin and a utility plugin?

    A productivity plugin saves time for the person managing the site: Commandify makes navigation faster, Smart Manager makes bulk editing faster, Duplicate Post makes content creation faster.

    A utility plugin adds functionality to the site or protects it: security plugins, backup plugins, and SEO plugins are utilities. Both categories have value, but they solve different problems.

    A useful way to think about it: productivity plugins improve your experience as a site manager; utility plugins improve your site’s performance, safety, or capabilities for visitors and for the site itself.

    The wpRigel Team

    March 24, 2026
    Tools
  • Commandify vs Turbo Admin: Which WordPress Command Palette Is Right for You?

    Commandify vs Turbo Admin: Which WordPress Command Palette Is Right for You?

    Both Commandify and Turbo Admin exist to solve the same basic problem: WordPress admin navigation is menu-driven, mouse-heavy, and slow for anyone who lives inside their site every day.

    Both reach for the same solution: a command palette triggered by a keyboard shortcut that lets you type what you need instead of clicking through menus to find it. Both are genuinely good at what they do, and both have real users who swear by them.

    But they make fundamentally different architectural decisions, serve different primary users, and diverge dramatically the moment you need to do anything beyond admin navigation.

    This comparison lays all of that out clearly so you can pick the right one for your situation rather than guessing.

    If you want to understand what a command palette plugin does before diving into the comparison, the guide on what a command palette is and why WordPress users need one is a useful starting point.

    If you want to understand why the WordPress built-in palette is not a complete solution, the WordPress command palette limitations guide covers exactly that.

    Commandify vs Turbo Admin: The Core Architectural Difference

    This is the most important thing to understand before comparing any specific features.

    Turbo Admin is a browser extension first. Its primary product is a Chrome, Firefox, and Edge extension that you install in your browser once. After that, it detects any WordPress site you log into and activates automatically. No plugin install required on each site.

    Your settings and preferences travel with you across every site because they live in your browser, not on any individual WordPress installation.

    Commandify is a WordPress plugin first. You install it on a WordPress site and it becomes part of that site’s environment.

    Its features are deeply integrated with WordPress itself: it reads the actual admin menu structure, accesses the database directly for search results, runs maintenance tasks with real WordPress functions, and in Pro integrates natively with WooCommerce, Elementor, Bricks Builder, and CF7 at the application level.

    Neither approach is objectively better. They reflect entirely different priorities and produce different strengths and limitations. That distinction drives nearly every difference in the feature comparison that follows.

    Commandify vs Turbo Admin Side-by-Side Feature Comparison

    FeatureCommandify FreeCommandify ProTurbo Admin (Extension)
    Trigger shortcutCmd/Ctrl + KConfigurableConfigurable (not Cmd+K by default)
    Admin navigationYes — full menu mirrorYes — full menu mirrorYes — scraped from menu
    Content search (posts, pages, media)YesYesYes
    Fuzzy searchYesYesYes
    User lookupYesYesLimited
    Plugin/theme managementYesYesPartial (browse only)
    Maintenance commands (cache clear, etc.)YesYesNo
    WooCommerce orders/products/customersNoYes — full suiteLimited order/customer search
    WooCommerce context-aware actionsNoYesNo
    Elementor integrationNoYesNo
    Bricks Builder integrationNoYesNo
    CF7 + Flamingo integrationNoYesNo
    Fluent Forms integrationNoYesNo
    Dark modeNoYesNo (extension has separate UI tweaks)
    Frontend palette accessYes (admins only)Yes (admins only)No
    Per-user preferencesYesYes — extendedYes — stored in browser
    Admin bar cleanup (Barkeeper)NoNoYes
    Notice management panelNoNoYes (experimental)
    Works without plugin installNoNoYes (extension version)
    Works on SafariYesYesNo
    Works on client/shared sitesRequires plugin installRequires plugin installYes if you can log in
    Multisite supportYes (each subsite counts toward license)Yes (each subsite counts toward license)Yes (unlimited sites)
    Pricing modelFree foreverAnnual or lifetimeOne-time fee
    License scopeUnlimited5 / 30 / 100 sitesUnlimited sites, 6 browsers

    Where Commandify Wins

    Commandify-wordpress.org-banner

    WooCommerce Integration Is Not a Comparison, It’s a Category

    Turbo Admin has some WooCommerce order and customer search capability. It can find an order if you type the order number and open the customer profile. That is useful.

    Commandify Pro’s WooCommerce suite is a different magnitude entirely. It does not just find records — it understands context. Type #4521 and it recognises the hash as an order ID pattern and jumps directly to that order. Paste customer@email.com and it detects an email address and opens the customer record. Type a product SKU and it opens that specific product variation.

    Beyond lookup, Commandify Pro lets you take actions from within the palette itself. Change an order status. Add an order note. Recalculate an order total. Apply a coupon to an existing order. Edit a product’s stock, price, or status without visiting the product screen.

    These are not navigation shortcuts. They are actual workflow replacements. The full WooCommerce command suite is documented in detail in the guide on managing WooCommerce orders, products and customers faster with Commandify.

    For any store that processes orders daily, this difference is felt immediately and constantly.

    Page Builder and Form Plugin Integration

    Commandify Pro integrates directly with Elementor, Bricks Builder, Contact Form 7 with Flamingo, and Fluent Forms. From the palette, you can jump to a specific Elementor template, open a Bricks component, find a form submission by email, or locate a Fluent Forms entry by field data.

    Turbo Admin does not have integrations at this level. It navigates to admin pages. It does not understand the data structures of third-party plugins at the application level.

    For agency developers who manage client sites built on these tools, Commandify’s integration depth means you can retrieve a specific form submission or template component in seconds rather than drilling through nested admin menus.

    Maintenance Commands Built In

    Commandify Free includes maintenance commands accessible directly from the palette: clear cache, flush rewrite rules, regenerate thumbnails, run database optimizations, manage transients, and more. These are functional commands that execute WordPress operations, not just navigation shortcuts to settings pages.

    Turbo Admin does not offer maintenance commands. It is a navigation and search tool, not an action executor. If you manage WordPress sites regularly, the difference between being able to clear cache from the palette versus navigating to your caching plugin’s settings page is a small but constant workflow improvement every single day.

    Frontend Command Palette Access

    Commandify gives admin users access to the command palette from the frontend of the site, not just from within wp-admin. If you are reviewing how a page looks on the frontend and need to quickly edit it, find a related post, or trigger a maintenance action, you can do it without navigating back to the dashboard. Turbo Admin’s palette is wp-admin only.

    Where Turbo Admin Wins

    turbo-admin-homepage

    No Plugin Install Required

    This is Turbo Admin’s defining advantage. Install the browser extension once and it activates on every WordPress site you log into. For a freelancer or agency developer managing fifteen client sites, this means you get the command palette everywhere without touching the plugin manager on a single client installation.

    From a client relationship standpoint, this also means you are not adding a plugin to a client site they did not ask for. Your productivity tooling stays in your browser. The client’s plugin count and site footprint are unaffected.

    Commandify requires a plugin install on every site where you want to use it. For a developer managing a large portfolio of client sites, that installation overhead is real, even if it is small per site.

    Admin Bar and Notice Management

    Turbo Admin includes features specifically for improving the visual experience of wp-admin that Commandify does not attempt. The Barkeeper feature hides non-critical admin bar items into a slide-out panel, keeping the admin bar clean. The notice management panel (experimental at time of writing) moves admin notices into a dedicated panel so they do not clutter your screen during normal work.

    Commandify focuses entirely on the command palette interaction model and does not offer admin bar or notice management. If you find wp-admin visually cluttered and want a tool that addresses that alongside the command palette, Turbo Admin offers more in this specific area.

    Unlimited Sites at a One-Time Price

    Turbo Admin’s browser extension is a one-time purchase that covers unlimited WordPress sites and six browser installs. For a developer managing a large and growing portfolio where the site count changes regularly, this pricing model is simpler and scales with zero additional cost.

    Commandify Pro is priced per site tier, similar to most WordPress plugins. The Professional plan at $79/year covers 30 sites, which is sufficient for most agencies. But for very large portfolios or freelancers who manage many small client sites, the unlimited model of Turbo Admin’s extension has a clear pricing advantage.

    Safari Is Not Supported

    This deserves its own mention because it is a meaningful limitation for Mac-based developers. Turbo Admin’s browser extension works on Chrome, Firefox, Edge, and Chromium-based browsers. It does not work on Safari. If your primary browser is Safari, Turbo Admin’s extension is simply not an option for you. Commandify as a WordPress plugin works in every browser since it runs server-side.

    Commandify vs Turbo Admin: Real-World Decision Scenarios

    Scenario 1: WooCommerce Store Manager

    You handle 30 to 100 orders daily. You field customer emails, process refunds, check order status, update product stock, and look up customer order history throughout the day. You work exclusively on this one store.

    Choose Commandify Pro. The WooCommerce command suite turns your daily lookups from five-step navigation sequences into two-keystroke actions. Turbo Admin’s WooCommerce capabilities are not in the same category for this use case. The Pro Basic plan at $47/year covers five sites and pays for itself within days of daily use.

    Scenario 2: Agency Developer Managing 20+ Client Sites

    You log into different client sites daily. Sites are on different hosts. Clients use a variety of themes and plugins. Your workflow is navigation, content checks, plugin updates, and occasional maintenance. WooCommerce is a factor on some sites but not your primary daily task. You work in Chrome or Firefox.

    Turbo Admin’s extension is the right starting point. One install, every site, no overhead on client installations. You might also install Commandify on the specific WooCommerce client sites where you need the deeper order management capabilities, treating them as complementary tools rather than alternatives.

    Scenario 3: Solo Site Owner or Content Creator

    You manage one or two sites. You publish content regularly. You use Elementor or Bricks Builder. No WooCommerce. Your main friction is navigating to settings, finding old posts, and running occasional maintenance tasks.

    Start with Commandify Free. The free version on WordPress.org handles all of this and requires no payment. If you later find you want the page builder integration or dark mode, upgrading to Pro is an incremental decision. Turbo Admin is also a reasonable choice for the navigation use case, particularly if you manage multiple sites.

    Scenario 4: Mac User on Safari

    Simple answer: Commandify. Turbo Admin’s extension does not run on Safari. If that is your primary browser and you manage your sites from it, the choice is made for you.

    Scenario 5: Developer Who Manages Elementor and Bricks Sites

    You build and maintain sites for clients using Elementor and Bricks Builder. Your daily tasks involve jumping between templates, checking form submissions in CF7/Flamingo or Fluent Forms, and managing page builder components across multiple sites.

    Commandify Pro. The page builder and form plugin integrations mean you can access specific templates, submissions, and entries from the palette without navigating through the Elementor or Bricks admin interfaces. Turbo Admin cannot do this.

    You can read more about the Elementor template management workflow and the Bricks Builder template management guide to see this in practice.

    Can You Use Both?

    Yes, and this is actually a sensible approach for some agency developers. Turbo Admin extension gives you the no-install benefit across all client sites for general navigation.

    Commandify Pro gets installed on the specific sites where you need WooCommerce management depth, page builder integration, or maintenance commands. They do not conflict.

    The cost math works out reasonably. Turbo Admin’s extension is a one-time purchase. Commandify Pro’s per-site licensing can be applied selectively to the sites that need it. You are not paying for Commandify Pro on every site in your portfolio if only a subset of those sites need the deeper functionality.

    Turbo Admin vs Commandify Pricing Summary

    ProductFree TierPaid TierPricing ModelSite Limit
    Commandify FreeYes, full free version on WordPress.orgN/AFree foreverUnlimited
    Commandify Pro BasicFree version included$47/yr or $135 lifetimeAnnual or lifetime5 sites
    Commandify Pro ProfessionalFree version included$79/yr or $215 lifetimeAnnual or lifetime30 sites
    Commandify Pro EnterpriseFree version included$159/yr or $399 lifetimeAnnual or lifetime100 sites
    Turbo Admin (plugin)Yes, basic free pluginN/A (extension required for premium features)Free pluginUnlimited
    Turbo Admin (extension)3-site trial$35 one-timeOne-time paymentUnlimited, 6 browsers

    The Bottom Line

    Turbo Admin is a well-built tool that earns its reputation, especially for developers who need a no-install solution that travels with them across a large portfolio of client sites. Its admin bar and notice management features go beyond what Commandify offers on the visual side of the admin experience. And its unlimited site pricing is genuinely advantageous for high-volume agency work.

    Commandify’s edge is depth. It is not just a navigation tool, it is an action-execution environment. The WooCommerce command suite, page builder integrations, form plugin access, maintenance commands, and frontend palette availability make it more useful for users who want to actually do things from the palette rather than just find where to go.

    For anyone running WooCommerce seriously, there is no meaningful comparison: Commandify Pro is the choice.

    Start with Commandify Free from WordPress.org. It costs nothing and shows you immediately what the command palette model feels like in daily use. Upgrade to Commandify Pro when you want WooCommerce management, page builder integration, and the full action suite.

    Add Turbo Admin’s extension if you want seamless cross-site navigation without plugin installs on client sites. The two tools serve different enough use cases that owning both is a reasonable choice for serious WordPress professionals.

    Frequently Asked Questions

    Does Commandify conflict with Turbo Admin if both are active?

    No known conflicts exist between Commandify and Turbo Admin’s browser extension, as they operate in different contexts: Commandify runs server-side as a WordPress plugin, while Turbo Admin’s extension runs in the browser layer. Some users run both without issue.

    The main practical consideration is that both try to use Cmd/Ctrl + K as a default trigger, so you would want to configure one of them to use a different shortcut if running both simultaneously.

    Does Turbo Admin work on WordPress Multisite?

    Yes. Turbo Admin’s browser extension works on any WordPress installation you are logged into, including multisite network sites. It has no site count limit. Commandify also works on multisite, but each subsite counts toward your license limit, so a 10-subsite network uses 10 license slots on a Commandify Pro plan.

    Which is better for a solo blogger with one WordPress site?

    Commandify Free is the most straightforward answer: free, no browser extension required, full admin navigation and content search from install. If you are on Safari, Commandify is also the only option since Turbo Admin’s extension does not support Safari.

    If you are on Chrome or Firefox, Turbo Admin’s free plugin is also a reasonable choice for basic navigation use.

    Is Turbo Admin’s plugin the same as its browser extension?

    No. The free plugin provides basic command palette functionality but does not include the premium features exclusive to the browser extension: notice management, certain admin UI improvements, and the ability to carry settings across all sites.

    The extension is Turbo Admin’s full-featured product. The plugin is a free entry point, but the developer is clear that the extension is the recommended experience.

    How does Commandify Pro’s WooCommerce search work exactly?

    Commandify Pro uses pattern recognition to identify what you have typed. A hash followed by numbers (like #4521) is interpreted as an order ID. An email address format is interpreted as a customer lookup. A string matching known product SKU patterns opens the corresponding product.

    These patterns work without you selecting a search mode or specifying what type of record you are looking for.

    You type what you know and the palette figures out what you mean. See the WooCommerce commands documentation for the full pattern reference.

    The wpRigel Team

    March 24, 2026
    Commandify
  • Best WooCommerce Admin Tools and Plugins for Store Managers in 2026

    Best WooCommerce Admin Tools and Plugins for Store Managers in 2026

    Most “best WooCommerce plugins” lists are really product catalogues. They cover SEO plugins, payment gateways, and subscription extensions.

    They are written for people setting up a new store, not for people who already have a store running and spend hours inside the WooCommerce admin every single day.

    This guide is different. Every plugin here is evaluated through one specific lens: does it reduce the time and effort required to manage an active WooCommerce store? Not what it adds to the frontend. Not what it enables for customers. What it saves for the person managing the site from the inside.

    If you are a store manager handling daily orders, a developer maintaining WooCommerce sites for clients, or a business owner who does their own admin work, this list is built around your actual workflow.

    One note upfront: if your WooCommerce admin is currently slow, the WooCommerce admin speed guide covers technical and workflow fixes in detail. Getting the admin running well before adding more tools is always the right sequence.

    Category 1: Navigation and Daily Admin Speed

    Commandify Pro: Best WooCommerce Command Palette

    Free version on WordPress.org. Pro from $47/year.

    If there is one plugin that changes how WooCommerce admin feels to work in, it is this one. Commandify adds a command palette triggered by Cmd/Ctrl + K. Type what you need and act on it instantly, without touching the WooCommerce menu structure at all.

    The free version already covers full admin navigation, content search across all post types, plugin management, and maintenance commands. For WooCommerce store management specifically, the Pro version’s WooCommerce command suite is what makes it essential.

    Here is what it replaces in practice. Looking up an order currently means: WooCommerce menu, Orders, page loads, search for customer or order number, click the order. Five to seven steps. With Commandify Pro, you press Cmd/Ctrl + K, type the order number, and it is there.

    Commandify-wordpress.org-banner

    Type a customer email and it recognises the pattern and opens the customer profile. Type a product SKU and it opens the product. Change order status and add notes directly from the palette without visiting the order screen at all.

    For store managers handling support queries through a helpdesk or email, this is the tool that removes the daily bottleneck. You stop switching between your support tool and WooCommerce admin screens for every individual lookup. You paste, the palette recognises the pattern, you act, and you move on.

    You can read a detailed workflow walkthrough in the guide on managing WooCommerce orders, products and customers faster with Commandify.

    Best for: Any store manager or admin who performs daily WooCommerce lookups. The free version is worth installing on every WordPress site. Pro pays for itself in recovered time within the first week for active WooCommerce stores.

    Pricing: Free on WordPress.org. Pro Basic $47/year (5 sites) or $135 lifetime. Pro Professional $79/year (30 sites) or $215 lifetime. Full pricing here.

    Category 2: Bulk Operations and Product Management

    Smart Manager: Best for Spreadsheet-Style Bulk Editing

    Free version available. Pro from $149/year.

    WooCommerce’s built-in bulk editor is genuinely limited. You can change status and a handful of fields across selected products, but you cannot edit pricing, stock, SKUs, and custom fields across a filtered set of products from a single screen with formulas and conditional logic.

    Smart Manager fixes this with a spreadsheet-style interface that loads directly inside wp-admin. Every product, variation, order, coupon, or custom post type appears in a grid you can filter, sort, and edit inline.

    You change prices using formulas: increase all products in Category X by 15%, set all products with stock below 10 to a specific price, update all variations of a product simultaneously.

    For stores that run regular promotions, deal with seasonal pricing changes, or need to update supplier pricing across a large catalogue, the time difference between Smart Manager and doing this manually through individual product screens is extreme. What takes hours of clicking through individual product pages becomes a filtered grid edit completed in minutes.

    The Pro version adds bulk editing for WooCommerce subscriptions, bookings, and course post types if you use those extensions. It also includes an audit log that tracks who changed what and when, which is useful for teams where multiple people manage the catalogue.

    Best for: Stores with 100+ products that need regular bulk updates, seasonal pricing changes, or inventory adjustments across variable products.

    WooCommerce Product Import Export (WebToffee): Best for CSV-Based Catalogue Updates

    Free version on WordPress.org. Pro from $69/year.

    When your product updates come from supplier CSV files, when you need to migrate a catalogue from another platform, or when you want to maintain your product data in a spreadsheet and push changes in bulk, a dedicated import/export plugin is essential.

    WooCommerce has a built-in importer, but it handles basic fields only. The WebToffee plugin supports all product types including variable products and variations, custom fields and meta, product categories and attributes, upsell and cross-sell relationships, and custom taxonomy fields. The Pro version adds scheduled automatic imports from an FTP or URL source, which means your catalogue can stay synchronised with a supplier feed without manual intervention.

    The filtering options during export are also worth noting. You can export products by category, status, date range, or custom field value. This makes generating inventory reports and syncing specific product subsets much cleaner than the native WooCommerce export.

    Best for: Stores that receive supplier data in CSV format, run multiple sourcing channels, or need scheduled automatic catalogue updates.

    Category 3: Order and Customer Management

    WooCommerce Order Export (WebToffee): Best for Order Data Extraction

    Free version available. Pro from $69/year.

    WooCommerce’s native order export is rudimentary. It exports a basic CSV with limited field selection and no filtering by custom criteria. For accounting, for fulfilment handoffs, for generating reports for external platforms, this is not enough.

    The WebToffee Order Export plugin lets you export orders filtered by date range, status, shipping method, payment method, or any custom field. You choose exactly which fields appear in the export and in what order. The Pro version adds scheduled automatic exports to email, FTP, or URL endpoints, which is useful for teams using external fulfilment or accounting software that needs regular order data feeds.

    Best for: Stores that hand off order data to external fulfilment providers, accountants, or reporting tools on a regular basis.

    Fluent CRM: Best Self-Hosted WooCommerce CRM

    Free version available. Pro from $129/year.

    WooCommerce has a Customers section, but it is not a CRM. You can view a customer’s orders and basic information, but you cannot segment them, tag them based on purchase history, set up post-purchase sequences, or track their lifetime value against campaigns.

    Fluent CRM is a full self-hosted CRM that lives inside WordPress and syncs with WooCommerce data automatically. Every customer is imported with their order history, spend data, and product purchase records. You can segment customers by total spend, number of orders, specific products purchased, or any combination of factors. Automation sequences trigger based on WooCommerce events: abandoned cart, first purchase, repeat purchase threshold, product category purchases.

    The self-hosted model is the key differentiator from external CRM tools. Your customer data stays inside WordPress, on your server, under your control. No per-contact pricing. No external platform subscription that scales up with your list size. You pay for the plugin once per year and the data is yours.

    For stores that want customer segmentation and post-purchase email automation without the cost and data complexity of Klaviyo, ActiveCampaign, or similar external platforms, Fluent CRM is the clearest choice.

    Best for: Stores that want customer segmentation, post-purchase automation, and email marketing without paying per-contact pricing to an external platform.

    Category 4: Reporting and Analytics

    WooCommerce Admin Dashboard (Built-In): Start Here Before Adding Anything

    Free, included with WooCommerce.

    Before installing a third-party analytics plugin, spend an hour exploring WooCommerce’s native reporting. It is significantly more capable than most store owners realise.

    The WooCommerce Admin dashboard provides real-time sales figures, filterable reports for revenue, orders, products, categories, coupons, and customers. Reports are filterable by date range, product, category, and order status. The Performance Indicators section gives a configurable overview of your chosen metrics on the main dashboard.

    In 2026, the native analytics also includes customer lifetime value summaries, average order value trends, and product performance breakdowns. For a significant percentage of stores, the built-in reporting answers all the daily operational questions without any additional plugin.

    Install something additional only when you identify a specific reporting need that the native dashboard cannot answer.

    Metorik: Best for Advanced WooCommerce Reporting

    Paid, from $50/month. 30-day free trial available.

    When native WooCommerce analytics are genuinely not enough, Metorik is the benchmark external reporting tool for WooCommerce specifically. Not Google Analytics, not MonsterInsights. Metorik is built around WooCommerce data structures and understands them natively.

    It provides cohort analysis showing how customer purchase behaviour changes over time. Customer lifetime value projections based on actual purchase patterns. Subscription metrics if you use WooCommerce Subscriptions. Automated email digests sent to your team at intervals you define. Segmented customer exports for re-engagement campaigns.

    The pricing reflects that it is a specialist tool for stores where data-driven decisions have a measurable revenue impact. At $50/month, it is appropriate for stores doing meaningful monthly revenue where understanding customer cohort behaviour affects what you stock, how you price, and who you target with promotions.

    Best for: Growing stores where customer lifetime value, cohort retention, and subscription analytics directly inform business decisions.

    Category 5: Site Maintenance and Admin Health

    WP-Optimize: Best for Database Maintenance

    Free version available. Pro from $49/year.

    WooCommerce databases accumulate overhead over time. Expired transients, post revisions from product edits, orphaned order metadata, customer session data that was never cleared, and tables left behind by deleted plugins. On a store that has been running for a year or more, this accumulated overhead adds measurable query time to admin page loads.

    WP-Optimize handles cleanup through a checkbox interface that previews what will be removed before anything is deleted. It goes beyond what most caching plugins offer for database cleanup: it identifies and removes tables from plugins you have already deleted that remain in the database as orphaned remnants. It also integrates with UpdraftPlus for taking a database backup before any cleanup operation, which is good practice to have as a built-in step.

    Best for: Any store more than 12 months old, especially stores that have gone through periods of testing and removing plugins.

    Query Monitor: Best for Diagnosing Performance Problems

    Free.

    Not a permanent install. A diagnostic tool you use when something is slow and you need to know why. Query Monitor attributes every database query on any admin page to the specific plugin or theme that generated it. It also surfaces PHP errors, slow queries, uncached queries, and HTTP requests made during page load.

    Install it, visit the slow page, check Queries by Component. If a single plugin is responsible for the majority of your page’s query load, that is your answer. Remove Query Monitor after your diagnostic session is complete.

    Best for: Any situation where an admin page is noticeably slow and the cause is unclear.

    The Store Manager’s Recommended Stack

    how to manage woocommerce orders products and customers faster with commandify

    Not every store needs every plugin on this list. The right set depends on your catalogue size, order volume, and team structure. Here is how to think about building your stack.

    For Any Store, Start With These Two

    Commandify free is worth installing on every WooCommerce site regardless of size. The admin navigation improvement and maintenance commands alone justify the install. Upgrade to Commandify Pro when WooCommerce order and product management become a daily workflow.

    WP-Optimize is worth running quarterly on any store. Database cleanup is one of those maintenance habits that prevents slowness rather than fixing it after the fact.

    For Stores With Growing Catalogues

    Add Smart Manager when individual product edits become a time drain. The transition point is usually when you have 100+ products and find yourself making the same change across many products one at a time. That is exactly the use case Smart Manager solves.

    Add WooCommerce Product Import Export when your product data comes from external sources. If you receive supplier CSV files, import product data from another platform, or manage product content in a spreadsheet, this plugin turns that process from manual to automated.

    For Stores Focused on Customer Retention

    Fluent CRM becomes relevant when your marketing strategy moves beyond one-off campaigns to customer segmentation and lifecycle automation. It is also relevant when the per-contact pricing of external CRM tools starts to become significant relative to your list size.

    For Stores Where Data Drives Decisions

    Check whether the native WooCommerce Admin reporting answers your questions first. It is underused. If you genuinely need cohort analysis, subscription retention metrics, or customer lifetime projections, then Metorik earns its place.

    At $50/month it is not a casual addition, but for stores where those insights inform stocking and pricing decisions, the ROI is real.

    The fastest improvement you can make to your WooCommerce admin workflow today requires no technical knowledge and takes two minutes. Install Commandify free from WordPress.org, press Cmd/Ctrl + K, and type the name of any WooCommerce screen or order.

    Ready for the full WooCommerce command suite? Commandify Pro starts at $47/year with a 14-day money-back guarantee.

    Frequently Asked Questions on WooCommerce Admin Tools

    What is the difference between WooCommerce admin tools and WooCommerce store plugins?

    WooCommerce store plugins extend what your store can do for customers: payment gateways, subscription billing, product types, shipping options.

    WooCommerce admin tools improve how efficiently you manage the store from the inside: faster navigation, bulk editing, reporting, and customer management workflows. They solve different problems. Store plugins add capabilities. Admin tools save the time of the people running the store daily.

    Does Commandify work with all WooCommerce product types?

    Yes. Commandify Pro’s WooCommerce command suite supports simple products, variable products, and individual product variations. Each variation is accessible as its own searchable palette entry. It also works with custom post types registered by WooCommerce extensions.

    The full walkthrough is in the WooCommerce management guide.

    Is Smart Manager compatible with WooCommerce HPOS?

    Yes. Smart Manager has been updated for WooCommerce HPOS compatibility. If you have enabled High-Performance Order Storage, Smart Manager’s order management grid and bulk editing features work correctly with the new storage engine.

    Do I need Metorik if I already have Google Analytics on my WooCommerce store?

    They serve different purposes. Google Analytics tracks traffic, acquisition channels, and user behaviour across your site. Metorik tracks customer purchase patterns, order value trends, cohort retention, and subscription metrics using your WooCommerce order data directly.

    If your decisions are primarily about where traffic comes from and how users navigate the site, Google Analytics is the right tool. If your decisions are about customer lifetime value, which products drive repeat purchases, and how subscription cohorts retain over time, Metorik provides data Google Analytics cannot.

    How many admin tools is too many for a WooCommerce store?

    The right number is however many solve specific, real problems in your current workflow without duplicating each other. Installing tools speculatively, because they look useful or because a guide recommended them, adds plugin overhead without benefit.

    The test for each plugin should be: does this remove a friction point I experience daily? If yes, install it. If you are not sure, wait until the friction point becomes obvious enough to identify.

    The wpRigel Team

    March 24, 2026
    WooCommerce, user guides
  • Commandify Free vs Pro: Full Feature Comparison and Which One You Need

    Commandify Free vs Pro: Full Feature Comparison and Which One You Need

    Let’s be direct about something most plugin comparison articles won’t tell you.

    Commandify’s free version is not a stripped-down teaser. It’s a fully functional command palette that solves real problems for real WordPress users from the moment you install it. If you run a simple blog, a portfolio, or a content-focused site, you may never need to upgrade.

    But Pro is a different category of tool entirely. Not because of artificial feature locks, but because the workflows it unlocks are genuinely more complex. WooCommerce store management, page builder integrations, contact form workflows, pattern recognition, contextual commands. These require deep access to your WordPress data layer. That access is what Pro provides.

    This guide covers every feature in both tiers with real context, a clear comparison table, honest upgrade guidance for specific user types, and pricing details so you can make the right call for your situation.

    What Commandify Free Includes

    The free version is available on WordPress.org. No account required. No credit card. No nag screens. You install it, press Cmd/Ctrl + K, and it works immediately.

    Here is everything you get without spending a cent.

    commandify plugin free features at a glance

    Global Command Palette (Cmd/Ctrl + K)

    The core feature. A clean, centered command interface that opens instantly from any screen in your WordPress admin. No configuration, no learning curve. Press the shortcut, type what you want, press Enter.

    Most WordPress professionals spend an embarrassing amount of time clicking through nested menus to get to settings pages they visit every day. The command palette eliminates this entirely. Type “Permalinks” and you’re there. Type “Discussion” and you’re there. Type the name of any plugin’s settings page and you’re there. Instantly.

    What makes this different from simply bookmarking pages is that the palette mirrors your entire admin structure dynamically. Every submenu, every custom post type screen, every settings page added by third-party plugins appears automatically. You don’t configure anything. It just works.

    Full Admin Navigation

    Commandify reads your complete wp-admin menu structure and makes every item searchable. That includes nested submenus three levels deep, custom admin pages added by your plugins and theme, and any screen that WordPress registers with a menu entry.

    On a site with 20 active plugins, your left sidebar becomes a dense column of items most users scroll past looking for the one thing they need. With Commandify, you just type the name. Two keystrokes and you’re there.

    This alone is worth the install for anyone managing a plugin-heavy site.

    Universal Content Search

    Search posts, pages, media files, users, and any custom post type registered by your theme or plugins. All from the same search bar.

    Each result shows meaningful context. Status (published, draft, pending), date, author. And each result includes quick actions without opening the item first. Edit, View, Preview, Trash, Permanent Delete. You find the content and act on it in one step.

    For editorial teams managing hundreds of posts, this removes a daily navigation pattern that wastes minutes every single time. You stop visiting the Posts list to find a draft. You stop visiting Users to find a profile. You type and you go.

    Plugin and Theme Management

    This is the feature that surprises most people. Commandify free lets you activate, deactivate, install, and search plugins directly from the palette. Including searching the WordPress.org repository and installing a plugin without visiting the Plugins screen.

    Same goes for themes. Search, activate, manage from the palette.

    Most command palette tools lock plugin management behind a paid tier. Commandify ships it free. For developers and agencies who activate and deactivate plugins as part of their daily troubleshooting workflow, this is a genuinely useful free feature.

    User Search and Lookup

    Find any user by name, email, or role and open their profile immediately. Direct actions available from the result: Edit profile, View, or initiate quick collaboration.

    On sites with memberships, LMS enrollments, or customer logins, this saves the daily routine of navigating to Users, filtering by role, searching manually. You open the palette, type the person’s name, and you’re on their profile in two seconds.

    Bulk Maintenance Commands

    Clear cache. Empty trash. Delete spam comments. Check for updates. Remove expired transients. Rebuild image thumbnails.

    These are the routine housekeeping tasks that normally require you to visit multiple admin screens, install separate plugins, or remember which menu item is buried under which section. Commandify free exposes them as direct commands. One keystroke and they run, with a confirmation dialog for destructive actions.

    The transient cleanup alone is more useful than most standalone maintenance plugins. It handles 100,000+ records safely without timing out.

    Fuzzy Search

    The search engine handles typos and partial matches naturally. Type “plgins” and it finds Plugins. Type “woo prod” and it surfaces WooCommerce products. Type “perm” and it finds Permalinks.

    fuzzy search in commandify

    This matters because the quality of a command palette depends entirely on how confident you feel typing quickly without precision. A palette that only works when you type exact names forces you to slow down. Commandify’s fuzzy search lets you type how humans actually type under normal working conditions.

    Frontend Command Palette

    Commandify also works on the frontend of your site for logged-in administrators. Press Cmd/Ctrl + K while browsing any page of your site and the palette opens with theme-independent styling.

    This is useful for developers who review the public-facing site and want instant access to admin actions without switching tabs. It’s useful for content editors who spot a typo while previewing a page and want to jump directly to the editor. The frontend palette is often overlooked in comparisons but it’s a genuinely practical feature in day-to-day use.

    Per-User Preferences

    Every user on the site can configure Commandify to fit their personal workflow. Change the shortcut key. Adjust the number of search results shown. Modify debounce timing for faster or more deliberate triggering. Control which command categories appear.

    This makes Commandify genuinely multi-user ready. The editor who prefers Alt+K doesn’t interfere with the developer who uses Ctrl+K. Each person gets their own experience without affecting others.

    What Commandify Pro Adds

    Commandify-wordpress.org-banner

    Pro builds directly on everything in the free version. Every free feature is retained. What Pro adds is a completely different depth of capability, specifically built for professional WordPress workflows that go beyond navigation and content search.

    The key distinction is this: free navigates you to things. Pro lets you do things to them without visiting those screens at all.

    WooCommerce Command Suite

    This is the flagship Pro feature and the reason most WooCommerce store owners upgrade.

    Think about how a typical day looks for a store manager. A customer emails about their order. You go to WooCommerce, click Orders, wait for the page to load, search for the order by customer name or number, click the order, check the status, add a note, update the status, navigate back. That’s eight to ten actions for a workflow you repeat dozens of times a day.

    With the WooCommerce command suite, you press Cmd/Ctrl + K, type the order number or customer email, and the order appears in your palette with available actions. Change the status to Completed. Add a note. Apply a coupon. Recalculate totals. All with modal confirmations so you never make an accidental change.

    Products and variations work the same way. Every product in your catalogue appears as its own searchable palette entry. Every variation within a product is individually accessible. Edit pricing, update stock, change SKUs, view or delete. No Plugins screen visit required.

    Customer management is fully integrated too. Search by name or email. Open the profile. View their recent orders. Send an email. The kind of lookup a support team does twenty times a day becomes a two-second action instead of a six-click workflow.

    Dynamic Pattern Recognition

    This is one of the most underappreciated Pro features and one of the most useful in real support workflows.

    When a customer contacts you with an order number, you typically copy it from the email or ticket and then manually search for it inside WooCommerce. With pattern recognition, you just paste it directly into the command palette. Commandify recognises the format automatically.

    Type #4152 and it jumps directly to WooCommerce order 4152. Type @sarah and it opens the user profile for Sarah. Paste a customer email address and it identifies it as a customer lookup and shows their profile with direct actions. Type a product SKU and it opens the product. No search required. No pattern matching by you. The palette does it.

    For agencies handling support queries across multiple client sites, this feature alone changes the pace of the workday significantly.

    Contextual Commands

    Commandify Pro detects which screen you’re currently viewing and surfaces relevant commands before you type anything. In the post editor, it shows Publish, Save Draft, Preview, and Duplicate. On the Orders list, it shows order-specific actions. On a product page, it shows product management options.

    This is the difference between a dumb search tool and a smart workflow layer. Instead of always starting from a blank palette, Pro opens with commands that make sense for what you’re doing right now. It anticipates instead of waits.

    Smart Suggestions, Favorites, and Usage History

    The Pro palette opens with curated command groups. Favorites shows commands you’ve pinned. Recent shows what you accessed last. Most Used surfaces the actions you run repeatedly, surfaced automatically based on your real usage patterns.

    This means on a busy day when you’re repeating the same five actions over and over, the palette opens and those actions are right there. Zero typing required. For WooCommerce stores during a busy period like a sale or promotion, this is a genuine time-saver.

    Elementor Template Management

    Search, open, duplicate, rename, and delete Elementor templates without navigating to the Templates screen. For agencies and developers who work across large template libraries, this change removes a persistent daily friction point.

    Finding a specific template across a library of 50+ entries normally means opening Templates, scrolling or searching, clicking in. With Commandify Pro you type the template name and open it directly. On sites where templates are the core of the work, this is accessed dozens of times a day.

    Bricks Builder Template Management

    Full template management for Bricks Builder works the same way. Search, open, and manage templates directly from the palette. Commandify includes intelligent post type detection and gives you direct builder access from any screen in the admin.

    If you’ve moved to Bricks and your template library is growing, this feature becomes more valuable every week. See the existing guide on managing Bricks Builder templates faster for specific workflow examples.

    Contact Form 7 and Flamingo Integration

    Search all Contact Form 7 forms from the palette. Edit them, copy shortcodes, duplicate or delete them. View and search Flamingo submission entries without visiting the Flamingo inbox screen. Search posts and pages containing specific CF7 shortcodes.

    For sites where contact forms are a core lead generation or support tool, managing them through the palette removes a lot of tab switching and screen navigation.

    Fluent Forms Integration

    Search and open Fluent Forms, manage form entries and transactions, access Fluent Forms settings. Everything available from a single palette entry without visiting the Fluent Forms admin section.

    Advanced Settings Forms

    Edit core WordPress settings like site title, tagline, timezone, and discussion options directly from the palette through clean, validated forms. Settings display their current live values before you edit them, loaded via REST so you always see the actual current state.

    Toggle commands like maintenance mode show accurate true/false state before you act. You’re never guessing whether maintenance mode is on or off. You see it in the palette and toggle it from there.

    Free vs Pro: Complete Feature Comparison

    FeatureFreePro
    Global command palette (Cmd/Ctrl + K)YesYes
    Full admin navigation (all menus, submenus, CPTs)YesYes
    Content search (posts, pages, media, CPTs)YesYes
    Quick actions on content (edit, view, trash)YesYes
    Plugin management (install, activate, deactivate)YesYes
    Theme managementYesYes
    User search and profile accessYesYes
    Bulk maintenance commands (cache, transients, trash)YesYes
    Fuzzy, typo-tolerant searchYesYes
    Frontend command palette for adminsYesYes
    Per-user preferences and shortcut configurationYesYes
    WooCommerce order search and actionsNoYes
    WooCommerce product and variation managementNoYes
    WooCommerce customer toolsNoYes
    Dynamic pattern recognition (#ID, @user, email, SKU)NoYes
    Contextual commands (screen-aware suggestions)NoYes
    Smart suggestions, favorites, usage historyNoYes
    Elementor template managementNoYes
    Bricks Builder template managementNoYes
    Contact Form 7 + Flamingo integrationNoYes
    Fluent Forms integrationNoYes
    Advanced settings forms with live REST valuesNoYes
    Toggle and state commands (maintenance mode etc.)NoYes

    Commandify Pro Pricing

    Three plans. All come with a 14-day money-back guarantee.

    PlanSites CoveredAnnual PriceLifetime Price
    Basic5 sites$47/year$135 one-time
    Professional30 sites$79/year$215 one-time
    Enterprise100 sites$159/year$399 one-time

    Basic covers 5 sites at $47/year. That is less than $4 per month. For a WooCommerce store owner who recovers even 15 minutes of daily admin time, that payback is measured in hours, not months.

    Professional at $79/year covers 30 sites. For a freelancer managing a client portfolio, that works out to under $2.65 per site per year. See full pricing details here.

    Who Should Stay on Free

    Free is the right choice when your work inside WordPress is primarily navigation and content creation. If you write blog posts, manage pages, and handle a handful of standard admin tasks each day, the free version removes the friction that matters to you without costing anything.

    Bloggers and content editors working within WordPress’s native tools will find the free version covers their workflow completely. You get fast navigation, content search, plugin management, maintenance commands, and a better admin experience from day one. There’s no expiry on these features and no limits that pressure you to upgrade.

    If you don’t run WooCommerce, don’t work with Elementor or Bricks, and don’t handle contact form submissions daily, you may never need Pro at all.

    Who Should Upgrade to Pro

    WooCommerce Store Owners and Managers

    If you manage orders, products, and customer queries daily inside WooCommerce, this is the clearest upgrade case. The WooCommerce command suite cuts 5 to 10 clicks from every common workflow. Across a full workday of support queries and order management, the recovered time is significant.

    At $47/year for 5 sites, the Basic plan costs less than most monthly SaaS subscriptions that save far less time. The math is straightforward.

    Agencies and Freelancers Managing Multiple Sites

    The Professional plan at $79/year covers 30 sites. For a freelancer handling 10 to 20 client installs, the per-site cost drops to almost nothing. The workflow improvements multiply across every site you manage daily. Client support, monthly maintenance, content updates, WooCommerce management for e-commerce clients. Pro makes every one of these faster.

    Elementor and Bricks Builder Users

    If template management is a core part of your daily workflow, the page builder integrations justify the upgrade on their own. The daily friction of navigating to a template, finding the right one in a long list, and opening it adds up fast. Commandify Pro removes that friction entirely.

    Support Teams and High-Volume Admins

    Anyone handling customer support with access to the WordPress admin spends a large part of their day doing lookups. Order numbers from tickets. Customer emails from support conversations. User handles from forum threads. Pattern recognition turns each of these lookups from a multi-step process into a two-second palette interaction.

    If this describes your team, Pro pays for itself in the first week.

    Not sure which fits you? Start with Commandify free on WordPress.org. Use it for a week. When you find yourself wishing for order lookup, template management, or WooCommerce actions, the upgrade path is clear. Commandify Pro starts at $47/year with a 14-day money-back guarantee.

    Real Workflow Comparisons: Free vs Pro in Practice

    Numbers and feature tables are useful. But the clearest way to understand the difference is to see specific workflows side by side.

    Workflow 1: Handling a WooCommerce Support Query

    With Free: Customer emails with order #4152 asking why it hasn’t shipped. You navigate to WooCommerce, click Orders, wait for the page, search by order number, find the order, click it, check the status and notes, respond. Six to eight actions. One page load.

    With Pro: Press Cmd/Ctrl + K. Type #4152. The order appears with its current status. You add a note and update the status directly from the palette. Two actions. No page load.

    Workflow 2: Finding and Editing an Elementor Template

    With Free: Navigate to Templates via the left sidebar. Wait for the templates list to load. Scroll or search for the specific template. Click it. Wait for the builder to open.

    With Pro: Press Cmd/Ctrl + K. Type the template name. Select it. Builder opens directly. The difference is a few seconds each time, which adds up to minutes every day across dozens of template edits.

    Workflow 3: Looking Up a User

    With Free: Navigate to Users. Search by email or name. Click the user. Their profile opens.

    With Pro: Press Cmd/Ctrl + K. Paste the email directly. Pattern recognition identifies it as a customer email. Their profile and available actions appear immediately. One step instead of four.

    Frequently Asked Questions on Commandify Free vs Pro

    Can I use Commandify free forever without upgrading?

    Yes. The free version on WordPress.org is permanently free. No trial period, no feature expiry, no messages pressuring you to upgrade. All navigation, content search, plugin management, maintenance tools, and per-user preferences are available indefinitely at no cost.

    Pro is an optional upgrade for specific professional workflows, not a requirement for using Commandify effectively.

    Does Commandify Pro work with WooCommerce High-Performance Order Storage (HPOS)?

    Yes. The WooCommerce command suite is fully compatible with HPOS, which became the default storage engine in WooCommerce 8.2. If you’ve enabled HPOS on your store, all order search, lookup, and management commands work correctly.

    What happens to my settings if I upgrade from free to Pro?

    Your existing installation is upgraded in place. All per-user preferences, customised shortcut keys, and existing settings are preserved. Pro features activate immediately after license validation. There is no reinstall, no reconfiguration, and no data loss.

    Does Commandify work on WordPress multisite?

    Yes. Commandify Pro works on multisite installations. Each subsite in a multisite network counts toward your license limit. The Basic plan covers 5 sites, Professional covers 30, and Enterprise covers 100.

    Will Commandify slow down my WordPress site?

    No. Commandify loads its scripts only in wp-admin for logged-in administrators. It adds nothing to the public-facing site for regular visitors. Most commands use client-side filtering with no additional server requests per keystroke.

    Longer operations like maintenance cleanup show a progress bar so you know what’s happening. Performance impact on normal WordPress operation is effectively zero.

    How does Commandify compare to CommandUI and WP Spotlight?

    CommandUI and WP Spotlight are both command palette alternatives with their own strengths. CommandUI is more expensive than Commandify Pro for comparable site counts. WP Spotlight focuses more on search and navigation than on action-depth.

    Neither matches Commandify Pro’s WooCommerce command suite depth, pattern recognition, or page builder integrations. The full breakdown is in the CommandUI vs Commandify comparison if you want a detailed look at the alternatives.

    Is there a money-back guarantee?

    Yes. All Commandify Pro plans come with a 14-day money-back guarantee. If you upgrade and decide it’s not right for your workflow, you can request a full refund within 14 days of purchase.

    The wpRigel Team

    March 23, 2026
    Commandify
Previous Page
1 … 15 16 17 18 19 … 23
Next Page
wprigel logo

wpRigel builds innovative WordPress plugins for developers, marketers and agencies. Be with us, get more users for your business and increase conversion using our powerful tools.

  • x.com icon
  • linkedin icon

Products

  • Pollify
  • Commandify
  • Krom Automation (Now Live 🎉)

Company

  • Affiliate Program
  • About Us
  • Contact Us
  • Privacy Policy

Resources

  • Docs
  • Blog
  • Support Area
  • Refund policy
  • Coupons & Deals

Comparisons

  • Commandify vs CommandUI
  • Pollify vs CrowdSignal
  • Krom Automation vs others

Changelogs

  • Commandify Changelog
  • Pollify Changelog
  • Krom Automation Pro Changelog

wpRigel 2026. All Rights Reserved

  • Terms of use
  • Privacy Policy
  • Cookie Policy